
Welcome to Let’s Craft Together Blog Hop. We are a group of Australian Stampin’ Up!® Demonstrators that are coming together to share our creative ideas with you. We are happy that you can join us and hope that we can Inspire you to make creations of your own. Each month we will be showing different ideas based around products, themes and challenges.
Our Theme for our July Challenge is ‘Anything Animals’, this theme was set by Maheswari

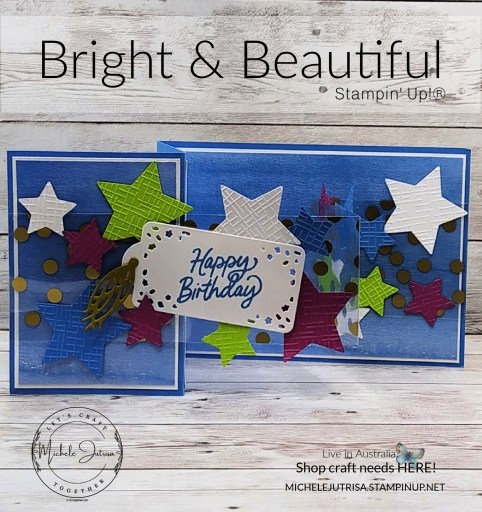
Zoo Crew
For this challenge I have decided to use the Zoo Crew Suite with a Fun Fold Card – Pillar Pop-Up Card. I made this card originally in 2022 – Stella Birthday

How to make this card…
You can find a YouTube Video showing how I made this card previously HERE
I made a couple of changes, which are
- No Designer Series Paper on the Frame, sponged around using blending brushes.
- DSP added to stand on the back
- When making this using Imperial Measurements your window size will be smaller. The Dancer and Band will be closer together
- I sponged edges of layers using Lemon Lolly and Lost Lagoon Ink (re Pic’s)
- I sponged Stage lighting using Lemon Lolly Ink and two pieces of post-it note to create a ‘V’
- Band – Beaver and Water Hog and adhered to the DSP, Frog is attached with 2 mini dimensionals
Measurements Used…
| Paper | Colour | Imperial/Letter | Metric/A4 |
| Card Base | Basic White | 4 ¼ x 5 ½” | 10.5 x 14.9cm |
| Card Base Mat DSP | DSP | 4 x 5 ¼” | 10 x 14.4cm |
| Card Frame/Window | Basic White | 3¼ x 4½ “ | 8.5 x 12.9cm |
| Pillars | Basic White | 1⅞ x 3″, score at ⅜, ¾, 1⅛, 1½” | 15 x 5cm, score at 1, 2, 3, 4cm |
| Stand | Basic White | 2 x 6¾” , score at ½, 4¾, 5½, 6¼ | 5 x 17.5cm, score at 1.5, 12, 14, 16cm |
| Stand DSP | DSP | 1¾ x 4″ | 4.5 x 10cm |
| Curtain Die – Valance – Side Drapes | Lost Lagoon | ¾ x 4½ “ 2½ x 4″ | 2 x 12cm 6.5 x 9cm |
| Curtain Tie Backs die | Lemon Lolly | scrap | scrap |
| Card Writing Panel Back | Basic White | 4 x 5 ¼” | 10 x 14.4cm |

Thank you for stopping by and reading my Blog. I hope you have enjoyed my projects & that you’re inspired to get crafty!
You may be starting here or have come from someone else’s blog – either way there is a list at the end of this post to help you move around all the different blogs and get many amazing ideas. We all have our country listed – so if you are looking for a demonstrator in your country, these demonstrators would love to look after you with your Stampin’ Up! ® shopping or if you would like to join our Stampin’ Up!® teams.
Follow the Hop here..
Stampin’ Up! products used in today’s Project
Product List")


Online Exclusives
To all the Online Exclusives click HERE, this items will not be found in the catalogues so check back throughout the year to see what is new.

Join My Team
If you have been sitting on the fence not sure if you should JOIN the Stampin’ Up! Family or not….well now is the time to jump down and JOIN.
If you enjoyed this post, please be sure to . . .


")


")

")
 Designer Series Paper")


 Textured Ribbon")


")


")


")
")
")

 Designer Series Paper")


")
")
 Designer Series Paper")


")
")


")


