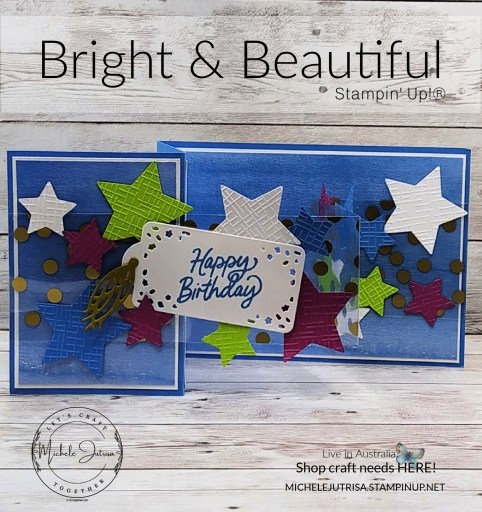
Artfully Composed

On my FB Live I created a card using the Artfully Composed Suite and the Swipe Technique. I also showed an example of this technique using Designer Series Paper.

Artfully Composed Suite consists of- Artfully Composed Bundle with its Artfully Layered Bundle ( Artfully Layered Stamp set & Tropical Layers Dies) Stamp set, White Frayed Ribbon, Faux Sea Glass Shapes, vellum Layering Designs and Artfully Composed designer series Paper.

The cards I made uses the ‘Swiping Technique’, where you swipe the ink pad across your cardstock. The angel & pressure you hold the ink pad results in different textures. This is also a great way to add extra texture to a piece of DSP also.

Cards made using the Artfully Composed Suite by Stampin' Up! & the Swipe Technique.

Measurements Used…

  • Card Base Calypso Coral: 10.5 x 29.9cm, scored at 14.9cm
  • Mat Mint Macron: 10 x 14.4cm
  • Card front Basic White or Artfully Composed Designer Series Paper: 10.5 x 14.9cm, cut down after stamping 9.7 x 14.1cm
  • Card Insert Basic White: 10 x 14.4cm
  • Basic White scrap & Calypso Coral scrap for stamping & sentiment
  • Gold & Rose Gold Metallic Specialty Paper
  • Pale Papaya Ribbon approx 25cm

Here I have both the finished card fronts. The one one left I started with a Basic White Cardstock and swiped with the ink pads and stamped. The other piece on the right is a piece of Designer Series Paper that had mostly a white back ground and was swiped with the ink pads.

Colours Used for Swiping Technique:

Pale Papaya, Calypso Coral, Mint Macron, Pear Pizzazz

Colours in Stamping:

Old Olive, Evening Evergreen

Card fronts made using the Artfully Composed Suite by Stampin' Up! & the Swipe Technique.

Thank you for stopping by and reading my Blog. I hope you have enjoyed my projects & that you’re inspired to get crafty!  

Stampin’ Up! products used in today’s Project

All products used are listed below and are linked to my On-Line Store

If you enjoyed this post, please be sure to . . . 

Amazing Silhouettes

This was a fun card to make using the Amazing Silhouettes Stamp set. You may not recognise this stamp as it is a sneak peak from the 2022 Jan-Jun Stampin’ Up! ® Mini Catalogue.

I tried to create a male theme card with the Amazing Silhouettes tree and the grays of the Heart and Home Designer Series Paper. The colours behind the tree are the colours in a sunset shinning through the tree.

The sentiment comes from the Handsomely Suited Stamps, heat embossed in black and cut into sections to create space.

Amazing Silhouettes Stampin' Up! 2022 Jan-Jun Mini Catalogue

I used the Stamparatus to help create the layers of colours. Using a Sponge Dauber to add one colour at a time to the stamp, then stamping each colour separately and making sure that each colour blends (or overlaps into the other).

The colours used are –

  • Misty MoonLight
  • Gorgeous Grape
  • Melon Mambo
  • Bumble Bee
  • Evening Evergreen
Amazing Silhouettes Stampin' Up! 2022 Jan-Jun Mini Catalogue

Creativity Abounds Blog Hop- Birthday

Welcome to Creativity Abounds Blog Hop.   We are a group of very keen Stampin’ Up!® Demonstrators from all around the world that are coming together to share our creative ideas with you.  We are happy that you can join us and hope that we can Inspire you to make creations of your own.

You may be starting here or have come from someone else’s blog – either way there is a list at the end of this post to help you move around all the different blogs and get many amazing ideas. We all have our country listed – so if you are looking for a demonstrator in your country, these demonstrators would love to look after you with your Stampin’ Up! ® shopping or if you would like to join our Stampin’ Up!® teams.

Our Theme this month is Birthdays

Follow the Hop ….

For More Inspiration we have our new Tutorial Bundle

he projects featured in this bundle are totally EXCLUSIVE, which means they can not be found anywhere else online.

Measurements are in both Imperial/ US Letter size and Metric/ A4.

There are a couple of different ways to get this tutorial…

  1. Purchase the tutorial by Clicking HERE
  2. Place a $50 order with me receive for FREE
  3. Join my team & receive for FREE

Here is the sneak peek images for this months Tutorial Bundle –

Creativity Abounds December Tutorial Bundle

Meet the Design Team of Creativity Abounds..

Creativity Abounds Design Team

Stampin’ Up! Product Used in today’s project

Amazing Silhouettes and Heart and Home Designer Series Paper is not listed below as they are not available as yet.

Product List

If you enjoyed this post, please be sure to . . . 

Facebook Live Friday – Heart of Home Suite

Hi and welcome today to my Blog. Yesterday on my Facebook Live I created this card using products from the Heart of Home Suite by Stampin’ Up!®. This suite is one of the many products coming in the 2022 Jan-Jun Mini Catalogue.

You can get this suite of products in December when you Join my Team See below for the fantastic Joining Special- Start with Savings.

Measurements Used…

  • Card Base Misty Moonlight: 10.5 x 29.9cm, score at 14.9cm
  • Mat basic White: 10 x 14.4cm
  • DSP: 9.7 x 14.1cm
  • Card Insert Basic White: 10 x 14.4cm
  • Sentiment Strip: Shimmery White: 1 x 10.5cm
  • Stamped image Shimmery White: 7 x 10.5cm
  • Leaves Pear Pizzazz – scrap

Join my Team

I would love you to Join me on my team ‘The Inkspots’.

Start with Savings promotion will provide you with an excellent opportunity to build your business! Instead of the standard $169 AUD | $189 NZD Starter Kit—which is already a steal of a deal—aspiring demonstrators can snatch up a completely custom Starter Kit for only $130 AUD | $145 NZD. What an absolutely unbeatable bargain for a box with a value of $235 AUD | $285 NZD!

What crafter wouldn’t want everyday discounts, early access to new products, exclusive access to events, and the opportunity to earn additional income and other rewards? I know I did….and for 10 years now have enjoyed these benefits plus more.

The friendships I have gain all around the world has been amazing.

Thank you for stopping by and reading my Blog. I hope you have enjoyed my projects & that you’re inspired to get crafty!  

Stampin’ Up! products used in today’s Project

All products used are listed below and are linked to my On-Line Store

Product List

If you enjoyed this post, please be sure to . . . 

Facebook Live Friday – Artistic Dies

Hi and welcome today to my Blog.

Well here we are all of NSW in Lockdown…that gives me some time to catch up with some sewing and maybe some blogging…

On Friday on my Live I made this card using the Artistic Dies by Stampin’ Up!, and some colourful strips of Cardstock. I CASED the idea for this card from Jennifer McGuire Ink – Cardstock Strips Technique

This Technique is a great way of using up all those scraps of cardstock or Designer Series Paper.

Artistic Dies by Stampin' Up!

Measurements Used…

  • Card Base Polished Pink – 10.5 x29.9cm, score at 14.9cm
  • Photo Copy Paper/ Printer Paper – 10.5 x 14.9cm or bigger
  • Card Front Basic White 10.5 x 14.9cm, cut into two to go either side of strips
  • Variety of coloured cardstock cut into strips 1cm and .5cm wide
  • Die Cut – 10.5 x 14.9cm
  • Sentiment -Scrap Basic Black
  • Card Insert Basic White- 10 x 14.4cm

Thank you for stopping by and reading my Blog. I hope you have enjoyed my projects & that you’re inspired to get crafty!  

Stampin’ Up! products used in today’s Project

All products used are listed below and are linked to my On-Line Store

Product List

If you enjoyed this post, please be sure to . . . 

Let your Colours Shine

Hi and welcome to my Blog today..

Today I am taking part in the ‘Ink & Inspiration’ Blog Hop. So my friends, I hope you will enjoy the ride with me as we travel around the hop seeing what everyone has to show.

The Theme for this month is ‘Let your Colours Shine’.

This years new Stampin’ Up! ® In-Colours are beautiful and I love working with them. They work really well together as well as independently. For this card I have used a ‘Floating Strips Technique’ by cutting the 2021-23 In-Colours in strips. The strips were cut at angles and adhered to Window sheet and then die cut using the Stitched rectangle Dies.

Stampin' Up! -  In-Colours, Butterfly Wings Dies, Stitched Rectangle Dies, Layering Circle Dies and Best Year Stamps

How to Make this Card…..

  • Card Base Basic Black – 10.5 x 29.9cm, scored 14.9xm
  • Card Mat Basic Black – 10 x 14.4cm, Embossed using the Tasteful Textile 3d Embossing Folder. Attach to the Card Base using Multi-Purpose Glue or Seal.
  • Circle Gold Metallic Specialty Paper – 10 x 10cm, cut with the largest circle die. Attach to the card front – it is not centered, placed slightly to the right of the card.
  • Window sheet – 10 x 14cm
  • Floating Strips of In-Colour Designer Series Paper – strips cut at different angles and at different sizes (width) adhered to the window sheet using Multi purpose Glue. Cut out two different size rectangles using the Stitched Rectangle Dies. Adhere the Foam Adhesive Strips on the back of the window sheet, hidden by the In-Colour DSP. Peel of the backing strips on Foam Strips and adhere to the card, one up & one down.
  • Butterfly Basic White – 11 x 9cm. Place Adhesive sheet to the back of the Basic White and die cut the larges Butterflies die from the Brilliant Wings Dies. Peel of the backing and adhere to the card on top of the Floating Strips. Double up two Mini Dimensionals and place under each of the bottom part of the butterfly wings.
  • Scrap Basic Black – 4 x7cm, Stamp the sentiment using VersaMark and heat emboss with white embossing Powder. Glue on to the butterfly using Multi-purpose Glue, this will also help to hide the dimensionals under the butterfly
  • Add some of the In-colour Jewels to the card Front.
  • Insert Basic White – stamp the coordinating sentiment in the right hand corner using Polished Pink Stampin’ Pad.
Stampin' Up! -  In-Colours, Butterfly Wings Dies, Stitched Rectangle Dies, Layering Circle Dies and Best Year Stamps

You may be starting here or have come from someone else’s blog – either way there is a list at the end of this post to help you move around all the different blogs and get many amazing ideas. If you have any questions about Stampin’ Up! ® or their products please let me know in the comments and I will get back to you.

Live in Australia and looking for a demonstrator? CLICK HERE to sign up for a copy of the 2021-2022 Annual Catalogue.

Follow the Hop here..

Stampin’ Up! Product Used in today’s project

Product List

If you enjoyed this post, please be sure to . . . 

Artistic Dies- Fridays Facebook Live

Hi and welcome today to my Blog.

This is the card I created in yesterdays Facebook live….This was so much fun, I love watercolouring like this as it’s very relaxing for me. The colours look great so vibrant against the black and white.

Stampin’ Up! shared this technique on Instagram done by one of the Concept Artists. They have wonderful short videos showing some great ideas that can easily be deprecated.

Below I have added measurements used to make the card, so you can follow the video and create this card also. I hope you will enjoy this as much as I did…let me know how you go.

Artistic Dies by Stampin' Up!

How to make this card..

Measurements Used-

  • Card Base Basic White Thick- 10.5 x 29.9cm
  • Card Mat Poppy Parade- 10 x 14.4cm
  • Card Front Pattern Party- 9.7 x 14.1cm
  • Vellum – 10 x 13cm
  • Fluid 100 Watercolour – 1 sheet
  • Sentiment 2 x 16cm, trimmed down to .8 x 14.1cm after stamping
Artistic Dies by Stampin' Up!

Thank you for stopping by and reading my Blog. I hope you have enjoyed my projects & that you’re inspired to get crafty!  

Stampin’ Up! products used in today’s Project

Product List

If you enjoyed this post, please be sure to . . . 

Expressions in Ink – May Ink & Inspiration Blog Hop #IIBH

Hi and welcome to my Blog today..

Today I am taking part in the ‘Ink & Inspiration’ Blog Hop. This is my first time hopping with this amazing group of people..So my friends, I hope you will enjoy the ride with me as we travel around the hop seeing what everyone has to show.

The Theme for this month is Sweet Suite…This theme is to highlight a suite of your choice from any current publication.

For my card I have chosen to use the Expressions in Ink Suite …. in the current 2021-22 Annual Catalogue I think this is my favorite (but this can change)..LOL!

This card just evolved…it started with nice straight cut edges and then I decided to add some stitching to it and I had some gold thread so why not. But then my edges looked too straight and tidy…I would normally suggest to tear before sewing but as I said it just evolved…

The leaf die cut was cut from one of the Pear Pizzazz Expressions in Ink Specialty Designer Series Paper. It was added onto the matted layers and then the 3 layers stitched together, so the stitching holds down the die cut leaf.

The roses were stamped in Poppy Parade, Bumble Bee and Fresh Freesia and the leaves stamped in Pear Pizzazz and Evening Evergreen.

The completed card ended up having a very shabby look. Maybe a bit different from where I started in the beginning, but I am really happy with it. Sometimes it works to let your project to take you on a journey…

You may be starting here or have come from someone else’s blog – either way there is a list at the end of this post to help you move around all the different blogs and get many amazing ideas. If you have any questions about Stampin’ Up! ® or their products please let me know in the comments and I will get back to you.

Live in Australia and looking for a demonstrator? CLICK HERE to sign up for a copy of the 2021-2022 Annual Catalogue.

Follow the Hop here..

Stampin’ Up! Product used in today’s project.

Click on the images to purchase

Product List
Expressions In Ink Suite Collection (English)
Poppy Parade Classic Stampin' Pad
Pear Pizzazz Classic Stampin' Pad
Evening Evergreen Classic Stampin' Pad
Basic White A4 Cardstock
Poppy Parade A4 Cardstock
Card Stock A4 Pear Pizzazz
Pearl Basic Jewels
Metallics Embossing Powders
Versamark Pad

If you enjoyed this post, please be sure to . . . 

Handsomely Suited – RFS Card

Hi and welcome today to my Blog.

My son turns 26th Birthday this month and I used the Stampin’ Up! Handsomely Suited Bundle to create this card for him. He has been in the Rural Fire Service since he was 15, joining as a Youth Member.

To explain our guys do not wear ‘Red Suspenders’ with their uniform but when my son joined he had to have the ‘Red Suspenders’…so they just HAD to go on his card.

Well Suited by Stampin' Up!

This is a fun card and when you look through Pinterest you will find some really fun uses of these Dies. Here are some examples that I found on Pinterest tonight.

Using the Stamparatus I stamped the Happy Birthday sentiment onto the card Insert, moving the plate down and doing 2nd,3rd,4th generation stamping.

Thank you for stopping by and reading my Blog. I hope you have enjoyed my projects & that you’re inspired to get crafty!  

Stampin’ Up! products used in today’s Project

Product List

If you enjoyed this post, please be sure to . . . 

Butterfly Bouquet

Hi and welcome today to my Blog.

Here is a very simple card to make using the Butterfly Bouquet by Stampin’ Up! ®. The Designer Series Paper fills the back ground with a simple sentiment and a Butterfly cut from the Rainbow Glimmer Paper.

How to Make..

Measurement used-

  • Card Base Bermuda Bay – 10.5 x29.9cm, score at 14.9cm
  • Mat Melon Mambo – 10 x 14.4cm
  • Card Front Butterfly Bijou Designer Series Paper – 9.7 x 14.1cm
  • Sentiment Panel Basic White – 7 x 10cm, cut with Stitched Rectangles Dies.
  • Butterfly cut from Rainbow Glimmer Paper
  • Card Insert Basic White – 10 x 14.9cm

Instructions-

  • Cut and score all cardstock
  • Adhere the Designer Series Paper to the Melon Mambo Mat
  • Attach the matted Designer Series Paper to the Bermuda Bay card base.
  • Die cut the Basic White and stamp the sentiment along the bottom.
  • Die cut a Butterfly using the Brilliant Wings Dies in the Rainbow Glimmer Paper.
  • Adhere the Butterfly onto the Basic White using Multi-pupose down the center of the butterfly.
  • Place dimensionals on the back of the sentiment panel and adhere to the from of the card.
  • Adhere the Insert into the inside of the card.

Thank you for stopping by and reading my Blog. I hope you have enjoyed my projects & that you’re inspired to get crafty!  

Stampin’ Up! products used in today’s Project

All products used are linked below to my On-line Store

Product List

If you enjoyed this post, please be sure to . . . 

Enjoy the Moment

Hi and welcome today to my Blog.

My card today uses the Stampin’ Up! ® Enjoy the Moment Stamp Set from the 2021 Jan-Jun Mini Catalogue. This is not a stamp set I would have picked myself but as a demonstrator Stampin’ Up! ® gave us this set at our last On Stage Event (for Demo’s – one of the great perks you get when you Join.)

Enjoy the Moment by Stampin' Up!

I wanted these card to have a rustic earthy feel, so for one card I used green tones and the other yellows.

Enjoy the Moment by Stampin' Up!

These cards were made on my Facebook Live on Friday and can now be found on my YouTube Channel. The video is posted below for you. Please like my YouTube Channel to follow me and to help with my Subscription numbers so I can go live on YouTube in the future.

Thank you for stopping by and reading my Blog. I hope you have enjoyed my projects & that you’re inspired to get crafty!  

Stampin’ Up! products used in today’s Project

Click on the Links below to purchase any of these products from my On-Line Store (Australia Only)

Product List

If you enjoyed this post, please be sure to . . .