Enduring Beauty & Thoughtful Moments

When I first saw the NEW Stampin’ Up!® Mini Jan – April 2024 Catalogue I got very excited about some of the wonderful new products. One of these products is the Enduring Beauty Bundle and another was Thoughtful Moments Hybrid Embossing Folder .

Below I have linked the Youtube video showing how I have used these wonderful products.

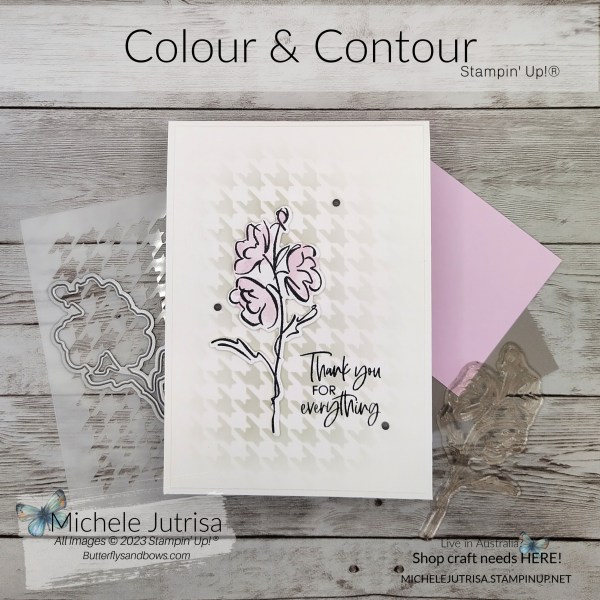
The Enduring Beauty Bundle is made up of outline stamp of the floral image, 5 masks for the layers of colour and dies for the image, leaves and sentiment.

Thoughtful Moments Hybrid Embossing Folder gives you 9 wonderful sentiments for a variety of cards and there is no ‘Fussy Cutting’

Measurements Used…

 ColourImperial/LetterMetric/A4
Card BaseBubble Bath4 ¼ x 11”, score @ 5 ½”10.5 x 29.9cm, score @ 14.9cm
Card MatFresh Freesia4 x 5 ¼”10 x 14.4cm
Card Front BaseDSP3 ⅞ x 5 ⅛”9.7 x 14.1cm
Card InsertBasic White4 x 5 ¼”10 x 14.4cm
StampingBasic White4 ¼ x 5 ½”10.5 x 14.9cm
SentimentBasic White8½ x 5 ½”21 x 14.9cm

Thank you for stopping by and reading my Blog. I hope you have enjoyed my projects & that you’re inspired to get crafty!  

If you’re in Australia and need help with your crafting needs and don’t have a Demonstrator, I’d love to assist you. Feel free to reach out to me at 0408868771 or michele@jutrisa.com. Cheers!

Stampin’ Up! products used in today’s Project

All products used are listed below and are linked to my On-Line Store

Product List

Current Stampin’ Up!® Promotions

Click on image to find out more.

Customer Appreciation Gift

Shop with me and receive a FREE Gift, just use this Months Host Code shown below.

(Australia Only)

How to use the Host Code on your order.

If you enjoyed this post, please be sure to . . . 

Colour & Contour – Live with Michele

Today I’m taking part in the Just Add Ink ‘Clean & Simple’ Challenge and I am using Stampin’ Up!® Colour & Contour Stamps and Scalloped Contours Dies from the Annual Catalogue.

Just Add Ink #665

What is Clean & Simple?…Below is the definition by Just Add Ink, for some it’s just “Stamps, Paper, Ink”

What is “Clean & Simple”…Minimal accents and layers, clean colour pallets, nothing overly fussy…Basically the less is more concept!

Others say…there must be ‘White Space, Minimal layers, clean lines and shapes, few embellishments and they must be small, Patterned, Designer, textured, glittered and metallic paper to be kept to an absolute minimum’

Make sure you head over to Just Add Ink and check what the Design Team have created, make sure you also look at the other entries….better still create a project and add it to the challenge, have fun!

Colour & Contour

This card I used a very simple design to keep in with the ‘Clean & Simple’ theme….I have a Card Base and a Card front, both in white. The Card Front I added texture by using a mask from the New Abundant Beauty Decorative Masks (available in September to Order) with Smoky Slate.

The card front is adhere to the card base with multi purpose glue, making the two layers as one. You could very easily make this card with out the card front.

The flower image from Colours & Contours is a very simple design but has a beautiful flow to it with the curves lines of the flowers and stem. It is a two step stamp where there is a second stamp to fill in the petals of the flower heads and bud. I used Memento Tuxedo Black to stamp my image and Bubble Bath to colour the petals and bud.

I finished of this card with just 3 Classic Matt Dots.

Measurements Used…

Thank you for stopping by and reading my Blog. I hope you have enjoyed my projects & that you’re inspired to get crafty!  

Stampin’ Up! products used in today’s Project

All products used are listed below and are linked to my On-Line Store. Only product not shown is Abundant Beauty Decorative Masks, not available until September

Product List

Online Exclusives

To all the Online Exclusives click HERE or on the image below, this items will not be found in the catalogues so check back throughout the year to see what is new.

Join My Team

If you have been sitting on the fence not sure if you should JOIN the Stampin’ Up! Family or not….well now is the time to jump down and JOIN.

If you enjoyed this post, please be sure to . . . 

Distressed Tile 3D Embossing Folder

Today I have used a NEW product found in the Sept-Dec 2023 Stampin’ Up! ® Mini Catalogue…..Distressed Tile 3D Embossing Folder.

It has that old world charm, that has been worn over time. It’s like that rug on the floor that has had people walking over it for hundreds of years, it has patches were the pattern is no longer visible but in other areas still vibrant and loved.

I embossed the vellum with the Distressed Tile 3D Folder, which left areas on the vellum that were sheer (allowing the DSP under the vellum to show through) and other areas opaque.

To complete the card I added Timeless Arrangements Bundle and Masterfully Made Designer Series Paper .

I used this card as my entry for the Global Design Project #406

Global Design Project #406 | Sketch Challenge

It’s time for a fabulous sketch challenge this week – there are so many great ways to interpret this sketch and make it your own. We know you’ll love it as much as we do! Here’s the sketch for this week’s challenge:

Why don’t you go to Global Design Project site and check out the other projects completed by the Design Team …. also the other entries.

How to make this card…

  • Cut all Cardstock and DSP
  • Vellum – Emboss with Distress Tile 3D Embossing Folder
  • Die cut leaves and flowers from Timeless Arrangements
    • Leaves- Pretty Peacock x 1
    • Flowers- Fresh Freesia x 1
    • Sm. Flower sprig – Berry Burst x 2
  • Sentiment – stamped with Memento Tuxedo Black
  • Adhere DSP to card base
  • Attach embossed vellum with glue dots over the DSP. Glue Dots are hidden under the textured parts of embossed vellum.
  • Adhere the layer flowers and leaves behind the sentiment, add dimensional’s and attach to card front. Add Berry Burst flowers with Multi Purpose Glue, tucking them amongst the other flowers and leaves.
  • Add In-Colour dots to card front. i used the Moody Mauve Dots which work with the Berry Burst in the card.
  • Adhere the DSP strip to card insert and attach to the inside of the card.

Cutting Measurements

PaperColourImperialMetric
Card Base Berry Burst5 ½” x 8½”, score @ 4 ¼”14.9 x 21cm, score @ 10.5 cm
DSP layer DSP3 x 5 ½”7.5 x 14.9cm
Vellum Vellum3½ x 4½”9 x 12cm
SentimentsBasic White1¼” x 2½” (Scrap)3 x 6.5cm (Scrap)
Leaves (on bar)Pretty Peacock3 x 3″ (Scrap)7 x 8cm (Scrap)
Flower (on bar)Berry Burst1½” x 4″ (Scrap)4 x 10cm (Scrap)
Small FlowersFresh Freesia2 x 3″ (Scrap)5 x 7cm (Scrap)
Card Insert Basic White 4 x 5¼” (Scrap) 10 x 14.4cm (Scrap)
 Insert Strip DSP ½ x 5¼” 1 x 14.4cm

Thank you for stopping by and reading my Blog. I hope you have enjoyed my projects & that you’re inspired to get crafty!  

Stampin’ Up! products used in today’s Project

Product List

Online Exclusives

To all the Online Exclusives click HERE , this items will not be found in the catalogues so check back throughout the year to see what is new.

Join My Team

If you have been sitting on the fence not sure if you should JOIN the Stampin’ Up! Family or not….well now is the time to jump down and JOIN.

If you enjoyed this post, please be sure to . . . 

Timeless Arrangements

This weekend I took part in a Creativity Abounds Stamp Camp using products from the Fresh as a Daisy Suite. As part of the camp we gave some challenges, which you could use any products you have to create with.

This Challenge was given to us by Sara Sayers from the UK – Kiss Kreative

I love the Timeless Arrangements Bundle, they are so easy to use. Having all those small flowers on a bar means you don’t have to fiddling with lots of small pieces. You can layer as little of many as you want and place them behind sentiments, ribbon or layers. You die cut them from cardstock, Designer Series Paper, foil (gold, silver etc) or velum.

Stampin' Up! Timeless Arrangements Bundle

Love the colours in this against the Black, black always makes everything ‘POP’.

Quick Tips on creating this card..

  • Card front is Embossed using the Dot Folder from Basic 3D Embossing Folder
  • Flowers/Leaves on bars- you will require 2 for the front and 1 to cut down to use on card insert
  • Smaller Flowers and Leaves I used at least 4 on card front and others inside. These can be tucked in and around sentiment to fill areas you want to fill.
  • Flowers/leaves on bars are layered on top of one another and attached to back of embossed and die cut sentiment.
  • Left over flowers used to decorate strip on card insert – tried not to layer too much on top of each other. As you don’t want bulk on one side of strip.

Cutting Measurements

PaperColourImperialMetric
Card Base Basic Black4 ¼ x 11”, score @ 5 ½”10.5 x 29.9cm, score @ 14.9cm
Card Front  Basic Black4 x 5 ¼”10 x 14.4cm
Sentiment Basic Black2 x 3″5 x 7cm
Card Insert Basic White 4 x 5 ¼” 10 x 14.4cm
 Card Insert Strip Basic Black ¾ x 4″ 2 x 10.5cm
Scraps to cut flowersBerry BurstCut 3 – flowers on the bar
Poppy ParadeCut 3 – flowers on the bar
Crushed CurryCut 4-5 – smaller single Flowers
Pumpkin PieCut 3 – flowers on the bar
Old OliveCut 4-5 – smaller single Leaves
Granny Apple GreenCut 3 – leaves on the bar
Stampin' Up! Timeless Arrangements Bundle

Thank you for stopping by and reading my Blog. I hope you have enjoyed my projects & that you’re inspired to get crafty!  

Stampin’ Up! products used in today’s Project

Product List

Online Exclusives

To all the Online Exclusives click HERE , this items will not be found in the catalogues so check back throughout the year to see what is new.

Join My Team

If you have been sitting on the fence not sure if you should JOIN the Stampin’ Up! Family or not….well now is the time to jump down and JOIN.

If you enjoyed this post, please be sure to . . . 

Let’s Craft Together Blog Hop

Welcome to Let’s Craft Together Blog Hop. We are a group of Australian Stampin’ Up!® Demonstrators that are coming together to share our creative ideas with you. We are happy that you can join us and hope that we can Inspire you to make creations of your own. Each month we will be showing different ideas based around products, themes and challenges.

It was my turn to choose the challenge……Black and White – this is hard one, they are such a contrast…total opposites. Because being complete opposites you can get a very hard looking card and you need to have some softness and texture…I hope I have done this with my card.

Timeless Arrangements Bundle

This is the first time I have played with this bundle and I think I am in ‘LOVE’….Timeless Arrangements Bundle

And every time I think of the sentiment I used – ‘Thank you for being my Friend’…I start singing…, Who else loved the Golden Girls…LOL!

The card layers are very simple, there are just 3 – Card Base- Basic Black, Card Front- Basic White and Card Insert – Basic White.

This card was a case of playing….with scraps of Basic White, Basic Black and White Vellum…I stamped the all the images in Memento Tuxedo Black on Basic White (3-4 in each) and die cut. Using vellum, I die cut 3-4 each of the stand alone dies. I also cut one of the large dies( with the bar at the base) x 3 in Basic Black. Not all this was used but it gave me plenty to play with.

How to make this card…

  • I embossed the card front with one of the embossing folders from the Basics Embossing Folders found in the Online Exclusives on my Online Store.
  • Using the Basic Black Marker splattered some ink across the card Front by flicking the brush nib from the marker lid
  • Black Bakers Twine – separate the twisted twine. place a small amount of Seal onto card front and layer one strand of the twine in large loops onto the seal
  • Adhering the the 2 black die cuts to the back of the sentiment, one at the top and the other at the bottom. The sentiment is then attached to the front of the card front with dimensionals.
  • This forms a base. I then attached the stamped flowers and leaves and vellum pieces coming from under the sentiment.
  • To finish the card front I added some splatters of Wink of Stella.
  • The card front then was adhered to the card base.

Cutting Measurements

PaperColourImperial/LetterMetric/A4
Card Base Basic Black4 ¼ x 11”, score @ 5 ½”10.5 x 29.9cm, score @ 14.9cm
Card front Basic White4 x 5 ¼”10 x 14.4cm
Card Insert Basic White4 x 5 ¼”10 x 14.4cm

The card Insert was decorated with some of the left over die cuts and finished with a die cut banner over the top. ( I cut it down, so it wasn’t so long)

Thank you for stopping by and reading my Blog. I hope you have enjoyed my projects & that you’re inspired to get crafty!  

You may be starting here or have come from someone else’s blog – either way there is a list at the end of this post to help you move around all the different blogs and get many amazing ideas. We all have our country listed – so if you are looking for a demonstrator in your country, these demonstrators would love to look after you with your Stampin’ Up! ® shopping or if you would like to join our Stampin’ Up!® teams.

Follow the Hop here..

Stampin’ Up! products used in today’s Project

Product List

Online Exclusives

To all the Online Exclusives click HERE, this items will not be found in the catalogues so check back throughout the year to see what is new.

Join My Team

If you have been sitting on the fence not sure if you should JOIN the Stampin’ Up! Family or not….well now is the time to jump down and JOIN.

If you enjoyed this post, please be sure to . . . 

Regency Park # 004 Mystery Challenge – Let’s Craft Together Blog Hop

Welcome to Let’s Craft Together Blog Hop. We are a group of Australian Stampin’ Up!® Demonstrators that are coming together to share our creative ideas with you. We are happy that you can join us and hope that we can Inspire you to make creations of your own. Each month we will be showing different ideas based around products, themes and challenges.

This month Tracy has challenged us with a ‘Mystery Challenge’. It’s good every now and then to be taken out of your comfort zone to make something different from your style.

Regency Park by Stampin’ Up!®

I decided to use products from the Regency Park Suite Collection for my card. The DSP I wanted to be very neutral so the stamping became the focal point.

How to make this card…

Cutting Measurements

PaperColourImperial/LetterMetric/A4
Card Base Basic White8½ x 5 ½”, score @ 4¼”14.9 x 21cm, score @ 10.5cm
Piece 1 Basic White3¾ x 3½”9.5 x 7cm
Piece 2 Basic White2 x 1½”5 x 4cm
Piece 3 Balmy Blue 4¼ x ½” 10.5 x 1cm
 Piece 4 Mango Melody 4¼ x ¼” 10.5 x 0.5cm
DSP4¼ x 1¼”10.5 x 3cm
  • Card Base –
    • Stamp the front of card base with the leaf cluster stamp from the Petal Park Stamp Set. This stamp has two sets of leaves that come in towards the center. I took care and only inked up half of the stamp (to the center) and stamped around the card base front using Granny Apple Green Ink Pad.
    • I used the dot-age stamp to fill in some of the holes around the leaves.
    • Using a Blending Brush and working in a circular motion lightly add Granny Apple Green Ink around the edges of the card base.
  • Piece 1
    • Stamp the out line flower cluster from the Sentimental Park Stamp Set in Balmy Blue all over the Basic White cardstock.
    • Using Blamy Blue ink and stamping off to get a lighter tone use the fill in Stamp for the flowers
  • Piece 2
    • Stamp sentiment in Night of navy Ink
  • Piece 3 & 4
    • Balmy Blue Strip and Mango Melody Strip run through Basic 3D Embossing Folders – I used the ‘Hash’ folder, this is a similar design to the DSP I used.
  • Putting the card together
    • Adhere the DSP to underneath side of the Piece 1, on the left
    • Glue these two pieces (P 1 & DSP) to the card base.
    • Using multi-purpose glue adhere Pieces 3 & 4 across the width of the card towards the bottom of the already attached pieces (see my card for position)
    • Add dimensionals to Piece 2 and adhere to your card over the strips (3 &4)
    • Tie a large bow with white bakers twine, add a glue dot and position the bow under the bottom left corner of the sentiment.

Thank you for stopping by and reading my Blog. I hope you have enjoyed my projects & that you’re inspired to get crafty!  

You may be starting here or have come from someone else’s blog – either way there is a list at the end of this post to help you move around all the different blogs and get many amazing ideas. We all have our country listed – so if you are looking for a demonstrator in your country, these demonstrators would love to look after you with your Stampin’ Up! ® shopping or if you would like to join our Stampin’ Up!® teams.

Follow the Hop here..

Stampin’ Up! products used in today’s Project

Product List

View Mini Catalogue or Shop on Line Here


5 January – 1 May 2023
View Online | Shop Online

Join My Team

If you have been sitting on the fence not sure if you should JOIN the Stampin’ Up! Family or not….well now is the time to jump down and JOIN.

If you enjoyed this post, please be sure to . . . 

Hand-Penned Petals Fun Fold

Today on my ‘Live’ I created this great Fun Fold, this is another interesting find on Instagram that I just had to try. I have used the Hand-Penned Petal Stamps and coordinating Penned Flowers Dies. The Designer Series Paper used for this card is from the Dainty Flowers 12 x12″ found in the current Sale-A-Bration. When you spend $90 or $180 you can earn a product for FREE from the Sale-A-Bration Catalogue. Links to Catalogues and my Online Store can be found towards the end of my post.

The sentiment was die cut using the Amazing Thanks Dies

I am now following a Blog called Pinkfresh Studio and this is from a post back in last November. They have called it Fun Fold Birthday Inspiration Card with a Pop-Up Twist. It is great to be inspired by so many wonderful card makers.

Below I have added the measurements I used in both Metric/A4 and Imperial/ Letter (this is a smaller size card to Australia A4)

Measurements Used…

PaperColourImperial/ LetterMetric/A4
Card Base Fresh Freesia 5½ x 8½”, cut 2
Score- 1, 1¾, 3, 4½
21 x 14.9cm, cut 2
Score – 2.5, 4.5,7.5, 10.5cm
Front Strip Fresh Freesia¾ x 3½”2 x 9cm
DSP – Back 4¼ x 5½”10.5 x 14.9cm
DSP – Side15½ x 5½ “, cut 2 3 x 14.9, cut 2
Back Card Panel Basic White 4¼ x 5¼” 10 x 14.4cm
DSP Strip¾ x 5¼”2 x 14.4cm
FlowerBasic White3 x 4″10.5 x 8cm
SentimentPear Pizzazz2 x 4″5 x 10cm
SentimentGold Metallic Specialty Paper2 x 4″5 x 10cm

Thank you for stopping by and reading my Blog. I hope you have enjoyed my projects & that you’re inspired to get crafty!  

Stampin’ Up! products used in today’s Project

All products used are listed below and are linked to my On-Line Store

Product List

View Mini Catalogue or Shop on Line Here


5 January – 1 May 2023
View Online | Shop Online

View Sale-A-Bration Catalogue or Shop on Line Here

Stampin' Up! Sale-a-Bration Catalogue
5 January – 28 February 2023
View Online | Shop Online

Join My Team

If you have been sitting on the fence not sure if you should JOIN the Stampin’ Up! Family or not….well now is the time to jump down and JOIN.

View the Sale-A-Bration Catalogue Here

If you enjoyed this post, please be sure to . . . 

By the Bay

Today’s card I used the By the Bay Suite Collection in the 2023 Mini Catalogue by Stampin’ Up!®. The By the Bay 6 x 6″ DSP is the hero of this suite, the designs are stunning.

How to create this card…

The Sea Grasses were cut from DSP using two of the dies and the shells I cut from Basic White cardstock and coloured with Blends – Colypso Coral & Petal Pink. The shells were then lightly curved using a Bone Folder.

The sentiment was stamped in Night Of Navy Ink onto the sentiment strip.

Three of the Flat Adhesive-Backed Pearls attached to card.

A strip of the DSP was added to the side edge of the card

Cutting Measurements

PaperColourImperialMetric
Card Base Balmy Blue4 ¼ x 11”, score @ 5 ½”10.5 x 29.9cm, score @ 14.9cm
Card Mat Basic White4 x 5 ¼”10 x 14.4cm
Card Front DSP3 ⅞ x 5 ⅛”9.7 x 14.1cm
Sentiment Basic White 4 x 5 ¼” 2.5 x 110cm
Card InsertBasic White4 x 5 ¼”10 x 14.4cm
Insert TrimDSP¾ x 5 ⅛”2 x 14.1cm
ShellsBasic Whitescraps
 Grasses DSP scraps 

By the Bay Creativity Abounds Stamp Camp

If you love this suite join us at the By the Bay Stamp Camp for all the details click HERE Cost FREE when you purchase the By the Bay Suite Collection from me. If you from live out side of Australia, let me know and I can put you into contact with a Demo in your area from the design team.

Thank you for stopping by and reading my Blog. I hope you have enjoyed my projects & that you’re inspired to get crafty!  

Stampin’ Up! products used in today’s Project

Product List

View Mini Catalogue or Shop on Line Here


5 January – 1 May 2023
View Online | Shop Online

View Sale-A-Bration Catalogue or Shop on Line Here

Stampin' Up! Sale-a-Bration Catalogue
5 January – 28 February 2023
View Online | Shop Online

Join My Team

If you have been sitting on the fence not sure if you should JOIN the Stampin’ Up! Family or not….well now is the time to jump down and JOIN.

If you enjoyed this post, please be sure to . . . 

Saying Thanks Kit plus Adorable Owls

Have you seen the New Kit by Stampin’ Up!® Saying Thanks Kit, I just love all the bright colours, it is so vibrant and has so much ‘LIFE’ in it.

Then there is the ‘Adorable Owls‘ from the Sale-A-Bration catalogue which are too cute and needed to be added for ‘CUTE OVERLOAD’. The Adorable Owls you can get for FREE when you spend $90 (AU) from either the Annual or Mini Catalogues…..you have to get them, they are so fun to colour.

These cards were made at my Cardmaking Class and I had to step them up by adding these adorable owls. The Owls were stamped onto Shimmery White cardstock with Stazon Black ink and coloured using the Stampin’ Up Range of Watercolour Pencils and Watercolor Pencils Assortment 2 , blended with the Blender Pen.

The Saying Thanks Kits is am all inclusive kit…meaning everything is there for you to make 9 cards, 3 in each design. All you need is a pair of snips to cut the twine. The price on this kit is amazing at $23, ready to go and make – great for gifts or to have on hand to make a quick ‘Thank You Card’. You just can’t pass it up!

Saying Thanks Kit Details

Express gratitude to those who make your day, every day with the Saying Thanks Kit. This all-inclusive kit has everything you need to show appreciation to family and friends who light up your life! Make nine bright, colourful cards in no time to say thank you, recognise friends, and share your gratitude with a bright watercolour wash that won’t go unnoticed! The kit even features die-cut elements you can use for peek-through cards. You’ll never miss an opportunity to express gratitude with this colourful kit! Each kit comes with printed die-cut sentiments in Dutch, English, French, and German.

Kit includes:
* Printed and foil die-cut words
* Pre-designed projects
* Step-by-step instructions
* Pre-cut pieces (No prep work! Get right to crafting)
* Makes 9 cards: 3 each of 3 designs
* Folded card size: 5-1/2″ x 4-1/4″ (14 x 10.8 cm)
* 9 pre-printed envelopes
* Enough adhesive to complete projects
* White baker’s twine
* Iridescent diamond sequins
* A 9-7/8″ x 6-1/2″ x 1-3/4″ (25.1 x 16.5 x 4.4 cm) printed designer box for storage or crafting on the go

Kits by Stampin’ Up! are perfect for new crafters, busy crafters, or crafters who want quick and easy projects. All-inclusive project kits have everything you need in one box! Give as a gift or try them yourself. Kits are while supplies last. Order today!

Adorable Owls

Need whimsical, cute images for your next project? It’s “owl” good—you’ll find it in the Adorable Owls Stamp Set. Whether you use one owl or create a parliament by stamping them in a group, you’re sure to enjoy these darling little creatures. Try the masking technique to create depth if you want to create clusters of owls. Use them alone or pair them with the greetings in the set to create cards for a variety of occasions. The line art makes the images perfect for your favourite colouring technique.

Thank you for stopping by and reading my Blog. I hope you have enjoyed my projects & that you’re inspired to get crafty!  

Stampin’ Up! products used in today’s Project

Purchase the items below by clicking on the images.

Product List

View Mini Catalogue or Shop on Line Here


5 January – 1 May 2023
View Online | Shop Online

View Sale-A-Bration Catalogue or Shop on Line Here

Stampin' Up! Sale-a-Bration Catalogue
5 January – 28 February 2023
View Online | Shop Online

Join My Team

If you have been sitting on the fence not sure if you should JOIN the Stampin’ Up! Family or not….well now is the time to jump down and JOIN.

If you enjoyed this post, please be sure to . . . 

Heart & Home – Thank you

This card was made using the Heart and Home Bundle that is coming in the Stampin’ Up! ® Jan- Jun Mini Catalogue. This is a very simple card and only using a simple colour palette of Basic Gray, Basic White and Basic Black.

Stampin' Up! Heart & Home 2022 Jan- Jun Mini Catalogue

Products Used

  • Heart & Home Bundle
  • Layering Circles Dies
  • Basic Gray Catdstock
  • Basic White Cardstock
  • White Embossing Powder
  • Versa Mark
  • Basic Gray Ink
  • Memento Tuxedo Black
  • White Bakers Twine

The video below was an impromptu Facebook Live showing how I created this card.

https://youtu.be/EG2HVNo0AO4

Thank you for stopping by and reading my Blog. I hope you have enjoyed my projects & that you’re inspired to get crafty!  

Stampin’ Up! products used in today’s Project

If you enjoyed this post, please be sure to . . .