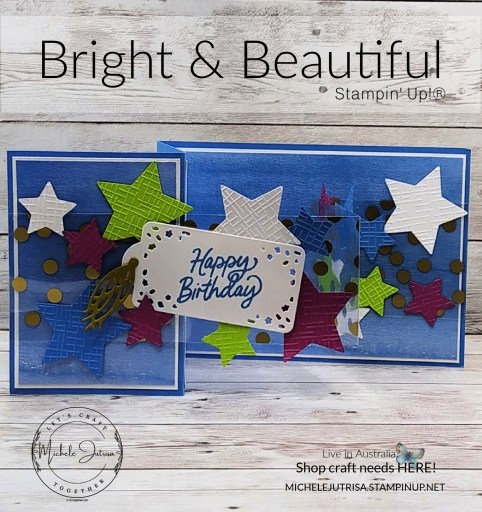
This is a very simple card and simple to recreate using any image and Designer Series Paper. Measurements and video are below.
Measurements Used…
Colour
Imperial/Letter
Metric/A4
Card Base
Lemon Lime Twist
4 ¼ x 5 ½” 2¾ x 5 ½”
10.5 x 14.9 7 x 14.9cm
Card Front
Basic White
2½ x 5¼”
6.5 x 14.4cm
Card Insert
Basic White
2½ x 4”
6.5 x 11cm
Accordion
DSP
4 ¼ x 8¼” Score @ 2¾, 5 ½”
12 x 22.5 Score @ 7.5, 15cm
Thank you for stopping by and reading my Blog. I hope you have enjoyed my projects & that you’re inspired to get crafty!
If you’re in Australia and need help with your crafting needs and don’t have a Demonstrator, I’d love to assist you. Feel free to reach out to me at 0408868771 or michele@jutrisa.com. Cheers!
Stampin’ Up! products used in today’s Project
All products used are listed below and are linked to my On-Line Store
Last night on ‘Live with Michele’ I created this Fun Fold – Faux Step Card, using the ‘O Holy Night Suite’. This suite you will find in the Sept – Dec Mini Catalogue by Stampin’ Up!®.
I saw this card created by Mary Deatherage, Mary used the Trucking Along Bundle to create her fun card. Which you can see HERE. Mary has great diagrams on the scoring lines, other wise you will see on my attached video, below.
O Holy Night is a BIG suite of products, for this card I have only used half of it. For me it really depicts what Christmas is all about with the Nativity scene depicting the birth of Jesus.
The Designer Series Paper, O Holy Night, has 3 sheets of scenes depicting desert, towns and night sky. They are 12 x 12″ (30 x 30cm), great for both cards and scapbooking. The only thing is you need to plan out what sections you want to use on your card and cut wisely. With my card below I used half a sheet, which left me with a few off cuts I will try to use on other projects.
Measurements Used…
These measurements may have changed from original, I’m sorry about that. Went to fix a small error and lost the lot, so had to rewrite these. Sorry for any inconvenience.
Colour
Imperial/Letter
Metric/A4
Card Base
Night of Navy
5 ½” x 8”, score along long edge @ 1”, 2”, 5”
14.9 x 20cm, score along long edge @2.5, 5,12.5cm
Card Base Front
DSP
⅝ x 5¼”
2.2 x 14.6cm
Card Base Back
DSP
2⅝ x 5¼”
7.2 x 14.6cm
Card Front
Night of Navy
3 x 6”, scored at 4¼”
8.5 x 15.5cm, score at 10.5cm
Card Front
DSP
2⅝ x 4⅛”
8.2 x 10.2cm
Sentiment
Very Vanilla
2½ x 2½”
6 x 6cm
Back Panel
Very Vanilla
2⅝ x 5¼”
7.2 x 14.6cm
Strip
DSP
½ x 5¼”
1.3 x 14.6cm
Nativity Scene & Camel
Basic Black
4¼ x 3¼”
8.5 x 10.5
How to…
Cut all cardstock and score
Designer Series Paper – All pieces are cut from a half sheet of DSP 15 x 30cm (6 x 12″), you need to plan out were you will be cutting first. Cut each piece in order as below, see video.
Cut the Card Base Strip DSP first – this is so you can cut in one strip.
Card Front Panel – Decide how much ground to sky you want to use. Cut your depth 10.2cm (4⅛”) and then work out the width for star placement on your card front.
Remaining DSP- cut Card Base and writing panel strip
Stamp sentiment onto Very Vanilla using Night of Navy Ink Pad and die cut using stitched square from Stylish Shapes
Adhere the Card Base DSP strip to the small mountain fold and Card Base DSP to larger mountain fold
Adhere the Card Front DSP to Card Front.
Add glue to the back of the card front…ONLY on the bottom 2cm ( 1″), height of the small mountain.
Fold card and adhere the back section of the Card Front to the back of the Card Base, again only approx 1cm (½”)
Add sentiment to card base.
Attach Nativity Scene with mini dimensionals
Writing panel
Attach DSP strip along the bottom
Adhere the camel, being careful on the amount of glue used.
Attach to the back of the Card Base.
Add Wink of Stella to star.
Thank you for stopping by and reading my Blog. I hope you have enjoyed my projects & that you’re inspired to get crafty!
Stampin’ Up! products used in today’s Project
All products used are listed below and are linked to my On-Line Store The O Holy Night Products will be avalble in September – December.
To all the Online Exclusives click HERE or on the image below, this items will not be found in the catalogues so check back throughout the year to see what is new.
Join My Team
If you have been sitting on the fence not sure if you should JOIN the Stampin’ Up! Family or not….well now is the time to jump down and JOIN.
Welcome to Let’s Craft Together Blog Hop. We are a group of Australian Stampin’ Up!® Demonstrators that are coming together to share our creative ideas with you. We are happy that you can join us and hope that we can Inspire you to make creations of your own. Each month we will be showing different ideas based around products, themes and challenges.
Tracy has given us a Tic Tac Toe Challenge….choose any three in a row, diagonal, vertical or horizontal.
You will notice we have made a few changes to Let’s Craft Together, we have changed our Logo and have added a few new members. So I hope you will enjoy the extra projects to visit. Please leave a comment as you follow our Hop around Australia.
Paper Florist Dies & Countryside Inn
For my card I am using – Easel Card, Flowers and Blue…….and ‘Yes’ you could say that my card falls into a few other categories as well such as Easel Card, Designer Series Paper and Birthday… O’ well, just making sure I was covered……LOL!
I have chosen two of the new blues or one returning colour and one new – Misty Moonlight and Boho Blue with a little bit of Basic White and Wild Wheat.
Measurements Used..
Tips and Tricks
Card Base – Front was scored diagonally to form Easel Card
Card Front, Countryside Corners Bundle – Stitching Line inked with Misty Moonlight Stampin’ Write Marker and die cut with coordinating die.
Card Insert – Smaller Countryside Corner die cut in Basic White for a writing panel on inside of the card
Countryside label die has 3 dimensionals to give it lift for stopper.
Large Flowers – 2 layers large petals + 1 smaller Petals
Small Flowers Daisy – Each flower has 3 layers
Thank you for stopping by and reading my Blog. I hope you have enjoyed my projects & that you’re inspired to get crafty!
You may be starting here or have come from someone else’s blog – either way there is a list at the end of this post to help you move around all the different blogs and get many amazing ideas. Please leave a comment, it’s always good to hear from you.
Welcome to Let’s Craft Together Blog Hop. We are a group of Australian Stampin’ Up!® Demonstrators that are coming together to share our creative ideas with you. We are happy that you can join us and hope that we can Inspire you to make creations of your own. Each month we will be showing different ideas based around products, themes and challenges.
Thank you Kylie for this fun challenge, Double Z-Fold cards are a easy & fun. There are so many great variations to the Z- Fold Card…check out this Pinterest page on Z-Fold Cards using Stampin’ Up! Products.
Bright & Beautiful Double Z- Fold Card
I created my card using the Bright & Beautiful Suite from the NEW Annual 2023-24 Stampin’ Up!® Catalogue. If you love Birthdays, Balloons and stars this is a fun suite. Great for birthday cards, general celebrations or any special moments. The dies cut balloons, stars, tags and work well for shaker cards. The Bright & Beautiful Designer Series Paper (DSP) is 6 x 6″, one side of the DSP has fun type images of stars, strips, waves, strips and confetti. The reverse side has ombre effects, variegate or shabby (as per my card), giving great texture effects for your cards.
The DSP coordinates with Berry Burst, Bubble Bath, Lemon Lime Twist, Pretty Peacock, Azure Afternoon and Blueberry Bushel. For my card I used the Azure Afternoon DSP and die cut stars in Berry Burst, Basic White, Azure Afternoon and Parakeet Party.
To add some extra texture to the stars I embossed them using one of the Basics 3D Embossing Folder found on the Online Exclusives in my Online Store.
The Bright & Beautiful Suite also includes Gold celebration Specialty Designer Series Paper – window sheets in 3 designs – spots, stars and confetti, streamer twirls. One side of the sheets are gold and the other side is in silver. I used the gold spots for the 2nd part of the Double Z-Fold, to create a see through element to my card. I was then able to attach the stars and tag to the window sheet so the stars and tag look like they are floating.
NB: make sure you use your bone folder to crease in the folds and to adhere to the card base I used lots of glue dots that hind nicely behind the dots.
On the back of the card I have added a panel to write your Birthday Greetings on.
Thank you for stopping by and reading my Blog. I hope you have enjoyed my projects & that you’re inspired to get crafty!
You may be starting here or have come from someone else’s blog – either way there is a list at the end of this post to help you move around all the different blogs and get many amazing ideas. We all have our country listed – so if you are looking for a demonstrator in your country, these demonstrators would love to look after you with your Stampin’ Up! ® shopping or if you would like to join our Stampin’ Up!® teams.
To all the Online Exclusives click HERE or on the image below, this items will not be found in the catalogues so check back throughout the year to see what is new.
Join My Team
If you have been sitting on the fence not sure if you should JOIN the Stampin’ Up! Family or not….well now is the time to jump down and JOIN.
Welcome to Creativity Abounds Blog Hop. We are a group of very keen Stampin’ Up!® Demonstrators from all around the world that are coming together to share our creative ideas with you. We are happy that you can join us and hope that we can Inspire you to make creations of your own.
Fancy Flora Suite Collection
I am really enjoying playing with this suite, I put of buying it for a little while, until I worked out what I was wanting……In the end I just had to get it, I love the flowers and the Designer Series Paper is stunning. There is so much in this suite it is totally worth the extra cost. There are 2 Bundles of Stamps and coordinating dies. But don’t feel you have to purchase the lot you can purchase just what you want.
** Remember you get a 10% off when you purchase the Bundles – Two-Tone Flora Bundle and Something Fancy Bundle
This is a 3 Fold Card, where the left side folds in first and then the left over the top. This card has two card fronts and I needed to show off this DSP, i just love all these colours.
This is a two step stamp and I found it easier to stamp the detailed image first and then using the same colour and the second image, stamp off onto a scrap of paper before stamping the rest of the flower. I used the centers of the flowers (stamen) as my guide for lining yp the images.
You may be starting here or have come from someone else’s blog – either way there is a list at the end of this post to help you move around all the different blogs and get many amazing ideas. We all have our country listed – so if you are looking for a demonstrator in your country, these demonstrators would love to look after you with your Stampin’ Up! ® shopping or if you would like to join our Stampin’ Up!® teams.
Follow the Hop here..
For More Inspiration we have our new Tutorial Bundle
Today on my ‘Live’ I created this great Fun Fold, this is another interesting find on Instagram that I just had to try. I have used the Hand-Penned Petal Stamps and coordinating Penned Flowers Dies. The Designer Series Paper used for this card is from the Dainty Flowers 12 x12″ found in the current Sale-A-Bration. When you spend $90 or $180 you can earn a product for FREE from the Sale-A-Bration Catalogue. Links to Catalogues and my Online Store can be found towards the end of my post.
Welcome to Creativity Abounds Blog Hop. We are a group of very keen Stampin’ Up!® Demonstrators from all around the world that are coming together to share our creative ideas with you. We are happy that you can join us and hope that we can Inspire you to make creations of your own.
Our theme this month is Fun Folds.
The card I have made is an Interactive Pop-Up Card using On the Farm Bundle from the January 2023 Mini Catalogue, plus the Day at the Farm Designer Series Paper which coordinates with the On the Farm Bundle and you can get this for FREE when you pend $90.
The Day on the Farm is $90 just the amount you need to get this great and fun Designer Series Paper as your ‘FREEBY’
This card was so much fun creating mini scenes of life on a farm. Can you find the little bunny? I added spots on the cows, eyes and beaks to the chicks and the ducks die cut in Basic White and coloured with Blends.
You may be starting here or have come from someone else’s blog – either way there is a list at the end of this post to help you move around all the different blogs and get many amazing ideas. We all have our country listed – so if you are looking for a demonstrator in your country, these demonstrators would love to look after you with your Stampin’ Up! ® shopping or if you would like to join our Stampin’ Up!® teams.
Follow the Hop here..
For More Inspiration we have our new Tutorial Bundle
he projects featured in this bundle are totally EXCLUSIVE, which means they can not be found anywhere else online.
Measurements are in both Imperial/ US Letter size and Metric/ A4.
There are a couple of different ways to get this tutorial…
Welcome to Creativity Abounds Blog Hop. We are a group of very keen Stampin’ Up!® Demonstrators from all around the world that are coming together to share our creative ideas with you. We are happy that you can join us and hope that we can Inspire you to make creations of your own.
Storybook Gnomes
Thanks for joining me on another Creativity Abounds Blog Hop, I have created a great card using the Storybook Gnomes.
I only received this in my order a couple of weeks ago and it is so much fun, I don’t know why I didn’t get it sooner. I have so many ideas running around my head and I just want to play…LOL!
You can find the Storybook Gnomes in the Stampin’® Up! July- December Mini Catalogue on pages 42 & 43. It is a suite Collection so you can order everything on one number – Storybook Gnomes 159630 or you can order by each product… REMEMBER order the Stamps and Dies as a Bundle and get the 10% discount Kindest Gnomes Bundle 159626
I have put together a PDF Tutorial on this card because I knew you would be asking me for it. All the measurements are listed in both Imperial and metric. You can just down load and use.
You may be starting here or have come from someone else’s blog – either way there is a list at the end of this post to help you move around all the different blogs and get many amazing ideas. We all have our country listed – so if you are looking for a demonstrator in your country, these demonstrators would love to look after you with your Stampin’ Up! ® shopping or if you would like to join our Stampin’ Up!® teams.
Follow the Hop here..
For More Inspiration we have our new Tutorial Bundle
he projects featured in this bundle are totally EXCLUSIVE, which means they can not be found anywhere else online.
Measurements are in both Imperial/ US Letter size and Metric/ A4.
There are a couple of different ways to get this tutorial…
This was my first play with Stampin’ Up! ® stamp set Stellar Birthday..it’s been sitting in my shelves for almost 11 months. The Designer Series Paper is from the Abstract Beauty and as soon as I saw this particular design I wanted to use it with the Stella Birthday stamps.
The Fun Fold is a Pillar Pop-Up Window card which I saw last night demonstrated by Rachel from Stamp your Art Out. On her page she has all the measurement if you use Letter size/ Imperial Measurements. Along with links to her video on YouTube.
I have made my card using measurements in A4 Cardstock/ Metric. Below is the measurements I have used and a video showing how I made my card…LOL. Along with my errors in measurements for the stand at the back.
Measurements Used…
Card Base Misty Moonlight: 10.5 x 14.9cm
Card Base Basic White: 10 x 14.4cm
Card Base Mat DSP: 10 x 14.4cm
Window Misty Moonlight: 8.5 x 12.9cm
Window DSP: 8 x 12.4cm
Pillars DSP: 15 x 5cm, score at 1, 2, 3, 4cm
Stand Misty Moonlight: 5 x 17.5cm, score at 1.5, 12, 14, 16cm
Extra Basic White stamping images: 10.5 x 14.9cm
scrap Gold Foil Paper to stamp stars
Thank you for stopping by and reading my Blog. I hope you have enjoyed my projects & that you’re inspired to get crafty!
Stampin’ Up! products used in today’s Project
All products used are listed below and are linked to my On-Line Store
Last Friday on my Facebook live I created this Flip Card using products from Stampin’ Up! Whimsy and Wonder Suite. This fun fold card is called a Flip Card and uses Partial Die Cutting – this is where only a part of the die area is cut.
Measurements Used…
Card Base Polished Pink: 14.9 x 21cm
Card Insert Basic White: 10 x 14.4cm
Whimsy and Wonder DSP: 10.5 x 14.4cm
2 x Die Cut Circles Basic White: 10.5 x 14.9cm
Die Cut Trees Scraps Whimsy and Wonder DSP
Blushing Bride Frayed grosgrain Ribbon: 50cm
Thank you for stopping by and reading my Blog. I hope you have enjoyed my projects & that you’re inspired to get crafty!
Stampin’ Up! products used in today’s Project
All products used are listed below and are linked to my On-Line Store