Colour & Contour – Live with Michele

Today I’m taking part in the Just Add Ink ‘Clean & Simple’ Challenge and I am using Stampin’ Up!® Colour & Contour Stamps and Scalloped Contours Dies from the Annual Catalogue.

Just Add Ink #665

What is Clean & Simple?…Below is the definition by Just Add Ink, for some it’s just “Stamps, Paper, Ink”

What is “Clean & Simple”…Minimal accents and layers, clean colour pallets, nothing overly fussy…Basically the less is more concept!

Others say…there must be ‘White Space, Minimal layers, clean lines and shapes, few embellishments and they must be small, Patterned, Designer, textured, glittered and metallic paper to be kept to an absolute minimum’

Make sure you head over to Just Add Ink and check what the Design Team have created, make sure you also look at the other entries….better still create a project and add it to the challenge, have fun!

Colour & Contour

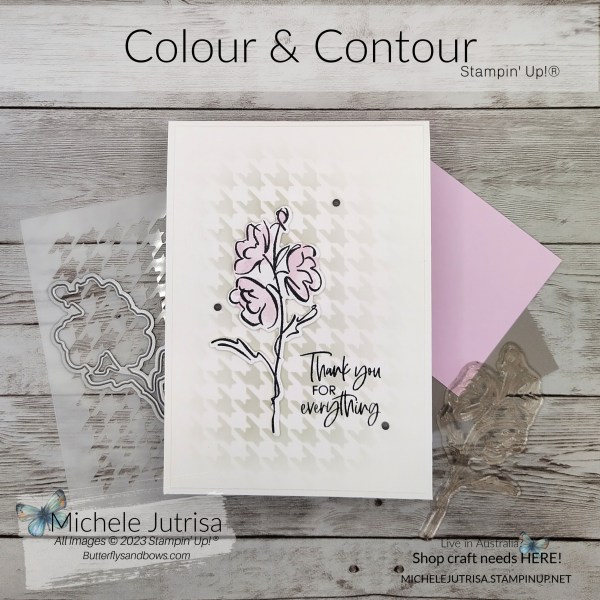
This card I used a very simple design to keep in with the ‘Clean & Simple’ theme….I have a Card Base and a Card front, both in white. The Card Front I added texture by using a mask from the New Abundant Beauty Decorative Masks (available in September to Order) with Smoky Slate.

The card front is adhere to the card base with multi purpose glue, making the two layers as one. You could very easily make this card with out the card front.

The flower image from Colours & Contours is a very simple design but has a beautiful flow to it with the curves lines of the flowers and stem. It is a two step stamp where there is a second stamp to fill in the petals of the flower heads and bud. I used Memento Tuxedo Black to stamp my image and Bubble Bath to colour the petals and bud.

I finished of this card with just 3 Classic Matt Dots.

Measurements Used…

Thank you for stopping by and reading my Blog. I hope you have enjoyed my projects & that you’re inspired to get crafty!  

Stampin’ Up! products used in today’s Project

All products used are listed below and are linked to my On-Line Store. Only product not shown is Abundant Beauty Decorative Masks, not available until September

Product List

Online Exclusives

To all the Online Exclusives click HERE or on the image below, this items will not be found in the catalogues so check back throughout the year to see what is new.

Join My Team

If you have been sitting on the fence not sure if you should JOIN the Stampin’ Up! Family or not….well now is the time to jump down and JOIN.

If you enjoyed this post, please be sure to . . . 

Prized Peony- Casually Crafting Design Team Blog Hop May

Welcome to Casually Crafting Blog Hop. 

The Casually Crafting Design Team is made up of a group of Independent Stampin’ Up! ® Demonstrators from around the word, that enjoy sharing our take on casual crafting. We’ll be sharing what we love with you every 3rd Saturday morning of each month on our websites.

Colour Challenge – In-Colours

This month the Casually Crafting Design Team are participating in a colour challenge to share with you…using the 2021-22 In-colours as our inspiration.

Colour Challenge by Casually Crafting

I am really loving this years In-Colours and they all work so well together. For my card I have used the Prized Peony Stamps by Stampin’ Up! to stamp the flowers in Fresh Freesia, Polished Pink and Pale Papaya. Filling in the gaps with leaves stamped in Soft Succulent.

Prized Peony by Stampin' Up! stamped in different colours from the 2021-22 In-Colours

How I made this card…

Measurements

  • Card Base Evening Evergreen – 10.5cm x 29.9cm, score at 14.9cm
  • Card Mat Evening Evergreen Designer Series Paper- 10.2 x 14.6cm
  • Card Front Basic White 10.5 x 14.9cm
  • Card Front Mat Soft Succulant – 7.3 x 14.6
  • Sentiment Basic White – 4 x 8cm
  • Card Insert Basic White- 10 x 14.4cm

Instructions

  • Adhere the Evening Evergreen Designer Series Paper to the Card Base.
  • Masks – Stamp at least 2 images of the Peony onto post-it notes and fussy cut.
  • Stamp the first image onto Basic White Cardstock using Polished Pink ink, cover image with one of the masks. Stamp the second image overlapping the masked image in Fresh Freesia ink, cover the new image with the second mask and then stamp again using Pale Papaya ink.
  • Keep covering the previously stamped image and repeat stamping until the Basic White cardstock is covered.
  • Leave a few white space around the Peony’s which can be filled with leaves stamped in Soft Succulent.
  • Trim down the stamped cardstock down to 7 x 14.6cm
  • Adhere the Soft Succulent mat to the stamped Card Front
  • Wrap White Backers Twine around the Card Front 3 times and tie off with a bow.
  • Add dimensionals to the back of card front and attach to the matted Card Base, positioning it towards the left side of the card base.
  • Stamp the sentiment onto the Basic White cardstock sentiment piece, using the Evening Evergreen Ink. Trim the width down to 2.5cm and flag the left hand side using the Banners Pick A Punch. Trim the right hand side straight, add dimensionals to the back of the sentiment. Put two dimensionals on top of one another and attach to the right hand side of the sentiment so it sits flat across the two leavels.
  • Add some of the using the 2021-22 In-Colour Jewels
  • Adhere the Card Insert into the inside of the card Base.
Prized Peony by Stampin' Up!

You may be starting here or have come from someone else’s blog – either way there is a list at the end of this post to help you move around all the different blogs and get many amazing ideas. We all have our country listed – so if you are looking for a demonstrator in your country, these demonstrators would love to look after you with your Stampin’ Up! ® shopping or if you would like to join our Stampin’ Up!® teams.

Follow the Hop here..

Stampin’ Up! Product Used in today’s project

Product List
Prized Peony Cling Stamp Set (English)
Basic White A4 Cardstock
Evening Evergreen A4 Cardstock
Soft Succulent A4 Cardstock
Polished Pink Classic Stampin' Pad
Pale Papaya Classic Stampin' Pad
Fresh Freesia Classic Stampin' Pad
Soft Succulent Classic Stampin' Pad
Evening Evergreen Classic Stampin' Pad
2021–2023 In Color Jewels
Baker's Twine Essentials Pack

If you enjoyed this post, please be sure to . . . 

Stamps, Paper & Ink #1

 Over the last few weeks I have been doing Facebook Lives called Stamps, Paper & Ink #1. The first in the series has now been Up Loaded to YouTube.

Over the coming weeks we will continue to look at Stampin’ Up!® products and how best to use them. I hope you will find these videos helpful to you and share them with others.

Please remember I am new to FB Lives and I am still learning, they will get better as we go along.

Any questions about Catalogues and products please contact me.


Set Sail….

‘Set Sail in the Direction of your Dreams’ ….Wow! What a wonderful sentiment and what better way to be guided through life but by a light house.

This is such a simple card to make and that’s because of the beautiful Designer Series Paper that Stampin’ Up! have designed for this range.

The Smooth Sailing Dies are also a great item and purchasing them with the Sailing Home Stamp set as a Bundle gives you the bonus of a 10% discount. The dies in the set cuts the anchor, light house, compass, 2 yachts, stitched banner and a stitched label. Plus there are some other extras stirring wheel, length of rope, rope knot, compass needles – all of which also has embossing and seaweed.

Keeping this short and sweet today…I hope you have enjoyed reading my Blog. If your interested in these products they will be available as of the 4th June. Any questions or you would like a catalogue please contact me via my contact form.

Bird Ballad meets Hugs from Shelli

I love it when a card idea comes together with ease.

The Bird Ballard Designer Series Paper coordinates with the stamps in the ‘Hugs with Shelli’ kit. You will be making cards with the stamp set long after the kit has gone.

The ‘Hugs from Shelli Paper Pumpkin kit is only available till the end of the month or while stocks last. So grab it now!

Thank You for reading my Blog. If you have any questions about the products used or would like to ‘Join my Team’ then please contact me.
All available products will be listed below and link to my On-Line Store. Other products used will be available from 2nd June 2019.

Table built using Product Table Builder by The Crafty Owl – Independent Stampin’ Up! Demonstrator.

Simple Stamping with Butterfly Gala

Simple Stamping with Butterfly Gala

Simple Stamping, getting back to the basics of stamping. Making a card that you can whip up in minutes, you don’t need many products and anyone can make.

Stampin’ Up! have given us a challenge…Simple Stamping…only using a note card, stamp and ink.

The stamp set I have used is ‘Butterfly Gala’, this set will be available in the 2019 Occasions Catalogue. You can purchase this stamp set along with a coordinating butterfly punch as a bundle. You will find in the Sale-A-Bration Catalogue other products that also coordinate with Butterfly Gala. Remember with the Sale-A-Brations when you spend $90 you can pick a FREE item for the Sale-A-Bration Catalogue.

So getting back to my card…it’s so simple.

How to…..

Products Used –

Steps-

As this is a Photopolymer Stamp Set I used a pierce mat with all stamping.

  • Using the Memento Ink stamp on the sentiment
  • Choose which Butterfly you wish to use (there are 4 different designs) and only ink up the large butterfly in Memento Ink. You can do this by covering the small butterfly with Washi Tape ink it up then peal off the Washi Tape check there is no ink on the smaller butterfly and stamp the image. The butterflies are paired so if you were using the punch it matches up perfectly. Do this twice to have 2 large butterflies.
  • Repeat this again but this time you are stamping the three small butterfly.
  • In the stamp set you will find solid wing parts for large butterfly and a solid butterfly or wing parts for the smaller butterfly. Using a different colour with each butterfly stamp the solid images lining them up with the outlined images.
  • Stamp the butterfly bodies and antennae with the Memento Ink


Thank you for reading my post about this simple but fun card…I will add links to the products used below, except for the Butterfly Gala.
If you live in Australia and would like a copy of the Occasions and Sale-A-Bration Catalogues then just contact me and I will get one to you.


Table built using Product Table Builder by The Crafty Owl – Independent Stampin’ Up! Demonstrator.