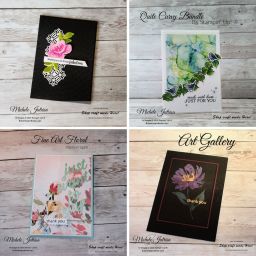
The card I’m showing you today is from The Stampin’ Up! January- June 2021 Mini Catalogue that went live yesterday….YAY! I love new catalogues full of new wonderful products to play with. Also along with the Mini Catalogue is the Sale-A-Bration Catalogue and my card today used products from both catalogues…
This card I CASed from Patty Bennett in the United States.
The Pretty Perennials comes as a bundle (purchase the bundle and get 10% discount). The Designer Series Paper(DSP) is Flower & Field from the Sale-A-Bration Catalogue – spend $90 and you can get this DSP for Free.
By purchasing the Pretty Perennials Bundle + Cardstock = Free Flower & Field DSP
Products & Measurements used-
Pretty Perennials Bundle NEW
Flower & Field Designer Series Paper NEW –
2 floral panels 4.7 x 14.6cm
Bumble Bee Dot Center Panel 5.1 x 14.9cm
Stitch So Sweetly Dies – Use rectangle die 6.3 x 9.3cm Approx
Just Jade cardstock –
Card Base – 21cm x 14.9cm, measure along the 21cm edge score @ 5 & 7.8cm. Turn cardstock around 180° (degree) and repeat. Found it easier to do it this way and more accurate..every time I scored across the 21 cm it came out wrong (don’t know why maybe it’s my math…LOL!)
cut 2 leaf/branches
Flirty Flamingo Cardstock – Cut 1 large flower
Bumble Bee Cardstock – cut 2 large flowers
Whisper White Cardstock – die cut Sentiment panel using Stitched so Sweetly dies
Just Jade Stampin’ Pad
Calypso Coral Stampin’ Pad
Memento Tuxedo Black Stamp pad
Matte Black Dots NEW
This year Sale-A-Bration will be for 2 months – January and February ( we will be having another Sale-A-Bration later in the year) Here is a short video on this fantastic Catalogue
This is a stunning catalogue full of wonderful products and great ideas for your next card. Click on the image below to see this great catalogue.
Another great Catalogue is also available now and that’s the Sale-A-Bration Catalogue.
Sale-A-Bration is one of our biggest promotions of the year. It’s packed with perks for demonstrators, overflowing with opportunities for customers, and filled with fun for everyone!
This is not only the best time to Purchase but also to JOIN Stampin’ Up!…want to know more then contact me..would love to have you JOIN my team.( Aust Only)
Happy New Year, I hope that no matter where you are in the world you had a Happy New Year with family and Friends. I spent New Year with my husband staying at home a good place to be at this time. We didn’t even stay up for the ‘Fireworks’ on TV….we must be getting a bit boring….LOL!
Butterfly Wishes
Today I have two cards to show you using the Stampin’ Up! ® stamp set – Butterfly Wishes. This stamp set is called a ‘Distinktive’ stamp, that is because the design is etched into the red rubber using different textures to achieve definition. This allows you to use only one colour and the stamp gives you a monochromatic image using that one colour.
How to make this card…
Measurements
Card Base Soft Suede – 10.5 x 28.9cm, score at 14.9cm.
Mat Crumb Cake – 10 x 14.4 cm
Card Front Balmy Blue – 9.5 x 13.9cm
Sentiment – Very Vanilla – 8.5 x 7cm
Card Inset Mat – Balmy Blue – 10 x 14.4cm
Card Insert Very Vanilla – 9.5 x 13.9cm
Instructions
Using Balmy Blue Stampin’ Pad stamp the butterfly images onto the Balmy Blue card front. Starting with the large butterfly, then medium and finish with the small butterfly to fill in any spaces.
Run the card front through the Stampin’ Up! ® Cut & Emboss Machine using the Subtle 3D Embossing Folder.
Adhere the card front to the Crumb cake mat.
Stamp the large butterfly onto the Very Vanilla cardstock, stamping off first to lighten the ink before stamping.
Stamp the sentiment over the top of the butterfly using Soft Suede Stampin’ Pad.
Die cut the sentiment using the die from the Stitched so Sweetly Dies.
Using the Detailed Trio Punch, punch two holes one on either side of the sentiment. With a pencil mark very lightly the half way mark on both sides of the sentiment, line up the notch on the punch to the pencil mark on the opposite side and punch. Repeat for other side.
Thread the vanilla ribbon from the Forever Greenery Trim Combo Pack trough the holes on the sentiment. Add a couple of dimensionals to the back of the sentiment and attach to the card front. Take the ribbon around to the back of the matted card front and secure the ends down using Seal +.
Using either Seal or Multi-purpose glue adhere the matted card front to the card base.
Insert – Stamp a couple of the butterflies onto the Very Vanilla Insert. Adhere the Very Vanilla insert to the Balmy Blue Mat and attach to the inside of the card.
My second Card
This card was made very similar to the above card, just a couple of changes.
Card Base Crumb cake – 10.5 x 28.9cm, score at 14.9cm.
Mat Crumb Cake – 10 x 14.4 cm
Card Front Basic White (Whisper White) – 9.7 x 14.1cm
Sentiment Crumb Cake – 1.2 x 9.7cm
Card Insert Basic White – 10 x 14.4cm
**Sentiment is stamped in Memento Tuxedo Black and has dimensionals on the back.
*** Basic White – New Cardstock replacing Whisper White soon. I did use the Whisper White.
Thank you for stopping by and reading my Blog. I hope you have enjoyed my projects & that you’re inspired to get crafty!
You can keep up to date with what is happening here on my Blog through my News Letter Highlights
Today I thought I would share with you some of the reasons why I joined Stampin’ Up! ®.
First I’m going to tell you a little about me and how I ended up here, where I am now.
I have always loved to craft. From a young age my mother taught me to sew and craft. I made things like dolls clothes and even clothes for myself. Holidaying with my Grandmother she taught me to knit and crochet. Later I learnt how to embroidery, lace making and tatting. My mother and grandmother were very talented ladies and passed lots of knowledge onto me.
After finishing school I studied fashion at the local TAFE (Technical and Further Education) for 2 years and then moved to Sydney to work as a machinist in a clothing factory. After a few years I left there and worked in retail, selling fabrics. While working I also took further studies at TAFE doing Embroidery.
During this time I meet my husband and we had 2 boys and married. We then decided to leave Sydney and move to the Southern Highlands. We had another two boys and by this stage we were taking lots of photos of all their activities and this is when I started to get into ‘Scrapbooking’. I did have an interest in telling stories with my photo’s and displaying them in ways to make them interesting well before this period of my life but really had very little knowledge of how and/or where to buy product.
I later heard about Creative Memories and started scrapping all my photo’s.
A few years later I joined a design team for a local shop and spent a few years creating and sometimes teaching at the shop. When they closed down I started my own business creating albums for others and it was around this time I heard about Stampin’ Up!. I went to a party held by a friend and then booked a party for myself.
So of course the next step was to join and I have loved every minute ever since.
So Why Stampin’ Up!®
Great quality – I love the fact that Stampin’ Up!® have great products and they are of the highest standard. They care about their products and how they perform. If they are not up to standard they have no problems with pulling them from the catalogue and try to improve then. Even though it may be frustrating to us and to them.
Great Value – Because they sell the stamps mostly in sets they are more cost effective. I like buying a set of stamps for $30-50 instead of one stamp for $30 (which I have done I the past)
Everything Co-ordinates – I LOVE THIS! All the Designer Series Paper, Cardstock and Embellishments coordinate. No more searching for a colour that will go
Its all one stop shopping…no need to search at different suppliers. It’s like going to the super market…I hate going to 2 or 3 places to get what I want. I just want to go to one place get it and go home…DONE!
The products are exclusive…Stampin’ Up! designed it, made it and sell it. 99% of the products you can only buy through a Stampin’ Up! ® Independent Demonstrator, like myself.
So why did I Join?
Everything above, plus more..
Great discount on product
You get to purchase the product before it’s released
Great training from Stampin’ Up!®, On-line and On Stage Events.
Always helpful and contactable – Staff are always willing to help in anyway they can.
I can make an income..big or small or just pay for my own hobby
What have I gained…
I have gained so much…lots of wonderful friendships from all over the world. I I have grown as a person and have gain a huge amount of confidence in what I am doing and who I am. You can make this business into what ever business you want…meaning – if you want to be a Hobby Demo and just only purchase for yourself you can (as long as you meet quarterly minimums), share it with just a few friends, run classes from your home (being Covid safe) or do everything On-Line.
As long as you follow the guidelines Stampin’ Up! ® have set out for us to use.
Thank you for stopping by and reading my Blog. If you live in Australia and want to know more about Stampin’ Up! Please contact me. Sale- A-Bration starts on the 5th January and this is the best time to Join
Thank you for joining us for our Stampin’ Up!® Demonstrator Monthly Blog Hop! As you follow the hop I hope you find lots of ideas and inspiration. We are a group of Stampin’ Up!® Demonstrators from around the world taking part in a training program helping us to build a successful Stampin’ Up!® Business and reach some of our goals. Thank you, we really appreciate your support.
Art Gallery – Thank You
This is the last Blog Hop for 2020…and this card says it all…’Thank you’. Thank you for following me, supporting me by liking, commenting and purchasing from me. This card was made for all of you. I am looking forward to next year and sharing with you all more of my projects.
This card was a bit of a mystery card card because I wasn’t sure how it was going to turn out, but I am pleased with the results. I have used the Art Gallery Photopolymer Stamp Set, from the Fine Art Floral Suite Collection which you will be able to find in the 2021 Jan-Jun Mini Catalaogue.
If you would like a copy of the 2021 Mini, live in Australia & you don’t have a Demonstrator let me know HERE …I will get one to you.
Have you ever tried to stamp on ‘Black’?
You can’t stamp on black as black will absorb the colour, so you need to add a barrier between the black and the colour you want to use. Whisper White Craft Ink is the best product for this as you can stamp on top of it or colour it with water colour pencils. I recommend you use the Stamparatus when doing this technique as you need to stamp exactly in the same place. The Whisper White Craft Ink takes longer to dry so make sure that the ink is dry before stamping on top with another colour.
Can you work out what colours I used?
Can you work out what colours I used…I bet you can’t as I was even surprised how the colours I used changed so much.
Stems – Granny Apple Green
Flower – Magenta Madness
Flower highlights – Melon Mambo
Flower Center – Gold Embossed
So what do you think…a BIG difference isn’t it. I even stamped the colours a couple of times to get a brighter colour. I may have achieved a true colour if I had used water colour pencils. So if you are going to try this at home using different colours, I would suggest you do a test first.
I am still very happy with the results. This is a simple card to make and because you use the Stamparatus you could make multiples of this card easily..perfect for my December Thank You cards.
Thank you for coming by today! If you wish to follow me please sign up for my News Letter HERE
We have an amazing line up of Stampin’ Up!® demonstrators and we know you are going to love all the amazing projects that you are going to see today.
So you don’t miss out on anyone’s page you are currently on my page – Michele Jutrisa. The next page to visit is listed below my name on the list below. (If I am the last on the list then, jump up the top and continue from there) Enjoy the hop!
Whisper White has been a Stampin’ Up! staple for so long. We love it and we know you love it, too. We are sad to announce that the supplier’s mill producing our Whisper White cardstock has permanently closed due to impacts from the COVID-19 pandemic. Unfortunately, we weren’t given much notice on this closure. This means that the technology unique to this particular supplier is now unavailable to us and we can no longer offer our Whisper White cardstock and related products, such as Whisper White Note Cards & Envelopes. Please note that this won’t affect any of our other cardstocks, this only affects Whisper White.
We know Whisper White has a huge fan base; we’re big fans, too! And we are crushed that it’s going away. Even though this decision was out of our hands, rest assured that we jumped right into action to find the best replacement paper possible. We have dedicated many hours to source and test alternative cardstock options from several suppliers to find the perfect fit that still maintains the Stampin’ Up! quality you know and trust. We are happy to share that we have found a winner for our new cardstock, Basic White!
The quality of our new Basic White was thoroughly tested by our quality assurance and product teams. It also tested very well with demonstrators and concept artists who gave it a huge thumbs up. We believe in the quality of the new Basic White cardstock and we know it will become your new crafting staple!
If you Order any of the Whisper White products head over to my On-Line Store
These items are now available while supplies last with an order limit of 2 per item per order.
Whisper White 12″ x 12″ (30.5 x 30.5 cm) Cardstock (124302)
Assorted Memories & More Cards & Envelopes (149710)
Whisper White Note Cards & Envelopes (131527)
Whisper White 3″ x 3″ (7.6 x 7.6 cm) Envelopes (145829)
Whisper White A4 Cardstock (106549)
Whisper White A4 Thick Cardstock (140490)
Whisper White C6 Envelopes (106588)
Here’s a video about the New Basic White Cardstock
Hi and welcome today to my Blog. I must start by apologising for not posting much over this past few weeks. I also run an alterations business- Michele’s Alterations and have been very busy working on garments including Formal dresses. I am looking forward to 2 weeks time where I will be taking a 3 week break over Christmas and will be spending time catching up on my crafting.
The project I will be sharing with you today is a Note Card Box with 5 coordinating Note cards. I used the Heartwarming Hugs Designer Series Paper along with the Peace & Joy Bundle to decorate the box and cards. This makes a great gift for family, friends or teachers…
Other products I used are..
Mini Paper Pumpkin Boxes
Note Cards and Envelopes
Plush Poinsettia Specialty Paper
Brushed Metallic 12 x12” Cardstock
Red Velvet Paper Pack
Envelopes Dies
Stitched So Sweetly
Dainty Diamonds 3D
Pine Tree Punch
Click on the Link below for a step by step instructions for making this card. Including all measurements for both A4 – Metric and Letter Size – Imperial
Today I have for you another sneak peek from the Stampin’ Up!® January – June 2021 Mini Catalogue.
The Art Gallery Bundle Photopolymer stamp set is a two step stamp and is stunning with its big full blooms and coordinating Dies.
The Fine Art Floral Suite Collection is made up of floral images and lots of gold accents. The Fine Art Floral Designer Series Paper has beautiful hand painted images of flowers on one side and on the reverse washes of coordinating colour and subtle designs. The Golden Garden Designer Specialty Acetate is made up of 3 sheets of acetate with stunning images in gold and on the reverse side it’s silver.
How did I make my card….
For my card I have used the reverse side of the Designer Series Paper because I just wanted the beautiful colour and texture of the paper to show through. On top of that I added a layer of the Golden Garden Specialty Acetate with the hint of golden flowers.
Stamp the flowers onto Whisper White cardstock…
Large flower was stamped in Rococo Rose, stamping off for the lighter shade and then stamped in full strength darker accents
The smaller blooms were stamped in So Saffron, Bumble Bee.
Pear Pizzazz for the leaves.
The sentiment was die cut from Basic Black cardstock, layered over a large circle of Vellum. Another circle of Whisper White cardstock was placed under the vellum to hide the ‘mess’ underneath. To complete the sentiment the words ‘Thank you’ was stamped onto Whisper White Cardstock using Pretty Peacock Stampin’ Pad and adhere to the card front.
A loop of Fine Art Ribbon which has a twinkle of gold thread running through it and peaks out from behind the flowers to finish my card off.
If you don’t have a demonstrator, live in Australia and you would like a copy of the Jan- Jun 2021 Mini & Sale-A-Bration Catalogues then Click HERE
OR
If you would like to get these products before January then you can by ‘Joining my Team’.
I hope you have enjoyed my card today, I have added my card to Kylie Bertucci’s International Stampin’ Up!® Blog Highlights for December Theme- Thank you.
Please go to Kylie’s Blog and have a look at all the amazing cards made for the Highlights, you can VOTE for for your favorite 5 cards by clicking on the little hearts.
To make it easy for you to find where to vote click on the image below ….. just make sure one of those votes is for me (LOL!)
Thank you for stopping by and reading my Blog. I hope you’ve enjoyed my projects & that you’re inspired to get crafty!
If you love great deals, our Giant Year-End Closeout event is the perfect time to shop. You’ll get deep discounts on your favourite products from the August–December 2020 Mini Catalogue—and as an extra bonus—you’ll get a peek at the list of items carrying over to the new annual catalogue. The Year-End Closeout happens only once a year, so don’t delay—make sure check this out.
Sales Period – 8 December 2020–4 January 2021
Retiring items are available while supplies last.
Due to increased shipping times and possible shipping delays during the month of December, we can’t guarantee delivery before Christmas.
Click Download for your copy of the Giant Year-end Closeout List
For unto us a child is born, unto us a son is given: and the government shall be upon his shoulder: and his name shall be called Wonderful, Counsellor, The mighty God, The everlasting Father, The Prince of Peace. Isaiah 9:6
Such beautiful and powerful words…These words come from the Old Testament where Isaiah prophecies about the birth of a child. A child that was special, a child who could bring nations in turmoil together. Hundreds of years later that child was born…Jesus Christ. As we come closer to Christmas I pray that we can all remember why we celebrate…that it’s not just a time of gift giving but a time to remember Jesus and what his birth means. That through him and having faith in him that we will live with him.
Hi and welcome to my Blog today…
I love these words….Hark the Angels sing….I love to sing and some say I have a nice voice and at Christmas time I love belting out all these old time favorites. But this year it will be hard because in Church at the moment we cannot sing because of Covid.
The For Unto Us Stamp Set by Stampin’ Up! has some wonderful sentiments that shouts out to us all to remember the birth of Christ Jesus. This stamp set will be one that I will keep and use or many Christmas’s to come.
How to make this card…
This was a simple card to make as the sentiment is the hero…
Card Base Whisper White Cardstock – 10.5 x 29.8cm, score at 14.9cm
Mat Basic Black Cardstock – 10 x 14.4cm
Card Front Whisper White – 9.7 x 14.1 cm
Sentiment Basic Black – 1.5 x 7.5cm
Card Insert Mat Basic Black Cardstock – 10 x 14.4cm
Card insert Whisper White – 9.7 x 14.1 cm
Forever Gold Laser Cut Specialty Paper – Large Leaf (use the white side of the leaf)
Forever Greenery Trim Combo Pack – 15cm Gold trim
Sponge Brayer
How to…
Whisper White Card Front – Using a Sponge Brayer & Coastal Cabana Stampin Pad, colour the cardstock. To get the variegated look you need to work down the cardstock and put less pressure on the brayer as you get toward the bottom of your work. To see what I mean watch this video I made last year using the same technique HERE
Once your card front is dry stamp your sentiment in VersaMark ink, cover with White Embossing Powder and set with a heat gun.
Forever Gold laser-cut leaf – apply very small amounts of multi-purpose glue to the gold side of the leaf and adhere to the card front
Sentiment – Stamp the sentiment onto the Basic Black strip using VersaMark Ink, cover with White Embossing Powder and heat set. Cut the left hand side of sentiment strip at an angel. Add Seal to the back of the strip, unravel the Gold trim and loop the fine gold threads behind the sentiment using the seal to hold them in place. Place 3 dimensionals to the back of the sentiment and attach the card front.
Adhere the card front to the Basic Black Mat using multi-purpose glue.
Attach the card front to the card base.
Card Insert – Stamp the ‘Glory to the Newborn King’ to the bottom right hand corner of the Whisper White Cardstock using the Coastal Cabana Stampin’ Pad.
Adhere the Whisper White cardstock to the Basic Black mat & then into the card
I love how this card turned out and I would love to post it to you. If you would love to receive this card then be the ‘First’ to comment below …& WIN my card!
Thank you for stopping by and reading my Blog. I hope you have enjoyed my projects & that you’re inspired to get crafty!


 Designer Series Paper")


 Circle Punch")


