In- Color 2023-25 – Creativity Abounds Blog Hop

Welcome to Creativity Abounds Blog Hop. We are a group of very keen Stampin’ Up!® Demonstrators from all around the world that are coming together to share our creative ideas with you. We are happy that you can join us and hope that we can Inspire you to make creations of your own.

Our Theme this month is In-Colors 2023-25

Stampin’ Up!® have given us 5 NEW In- Colors to use over the next 2 years. These colours – Wild Wheat, Boho Blue, Moody Mauve, Pebble Path and Cooper Clay. These 5 colours have great earthy tones they work well together and with other colours.

My take on these colours are….

  • Boho Blue – I love Blues
  • Wild Wheat – a great colour to use if you want Gold accents with out the shinny metallic gold. Wild Wheat also has green under tones which works well for leaves with Autumn tones.
  • Moody Mauve – This reminds me of Old Rose colours.
  • Pebble Path – This colour to me has a warm gray tones, a nice blend between browns and greys.
  • Cooper Clay – Cooper Clay is like the Wild Wheat , could be a replacement for metallic Cooper and again has autumn tones.

Dainty Delight

For my card I decided to use Boho Blue as my card base and back drop for the floral arrangement. With the Moody Mauve and the Boho Blue the Wild Wheat has a green tone.

The flowers I coloured with Moody Mauve Blends, Wild Wheat for the flower centers. The leaves I use Soft Sea Foam just to give a hint of a different green and not wanting to go too bright.

The ribbon, I unraveled approx 8cm and tied it into a note, rather than a bow. A bow in the coordinating ribbon – Boho Blue Textured Ribbon would have been a little too heavy against the lightness of the stems and floral image.

The sentiment I stamped using the Pebble Path ink, not as dark as the basic black

How to make this card…

Please note that the conversion from Metric/A4 to Imperial/Letter will change the look of the card slightly. There is a difference of roughly 1cm/ ⅜”. This all makes a difference to the layers in the length of the card. You could make the lengths of the DSP shorter but then in doing that the Die Cut stems would be longer than the DSP. So I will leave that to you to decide what you want to do.

Cutting Measurements
PaperColourImperial/LetterMetric/A4
Card Base Boho Blue4 ¼ x 11”, score @ 5 ½”10.5 x 29.9cm, score @ 14.9cm
Card Mat Basic White4 x 5¼”9.5 x 13.9cm
DSP Spot Boho Blue2¼ x 4¾”6.5 x 12cm
DSP Lines Boho Blue 3 x 4¼” 7.5 x 11cm
Stem  Wild Wheat2½ x 6″ 6 x 15cm
StemMoody Mauve2½ x 6″6 x 15cm
Stamped ImageBasic White2 X 4″5 x 10cm
SentimentBasic White¾ X 2¾”1.8 x 6cm
Card InsertBasic White4 X 5¼”10 x 14.4
Insert Strip SpotBoho Blue⅝ X 4″1.5 x 10cm
Insert Strip LinesBoho Blue¾ X 4″1.8 x 10cm

Thank you for stopping by and reading my Blog. I hope you have enjoyed my projects & that you’re inspired to get crafty!  

You may be starting here or have come from someone else’s blog – either way there is a list at the end of this post to help you move around all the different blogs and get many amazing ideas. We all have our country listed – so if you are looking for a demonstrator in your country, these demonstrators would love to look after you with your Stampin’ Up! ® shopping or if you would like to join our Stampin’ Up!® teams.

Follow the Hop here..

For More Inspiration we have our new Tutorial Bundle

Meet the Design Team of Creativity Abounds..

Stampin’ Up! products used in today’s Project

Product List

Online Exclusives

To all the Online Exclusives click HERE, this items will not be found in the catalogues so check back throughout the year to see what is new.

Join My Team

If you have been sitting on the fence not sure if you should JOIN the Stampin’ Up! Family or not….well now is the time to jump down and JOIN.

If you enjoyed this post, please be sure to . . . 

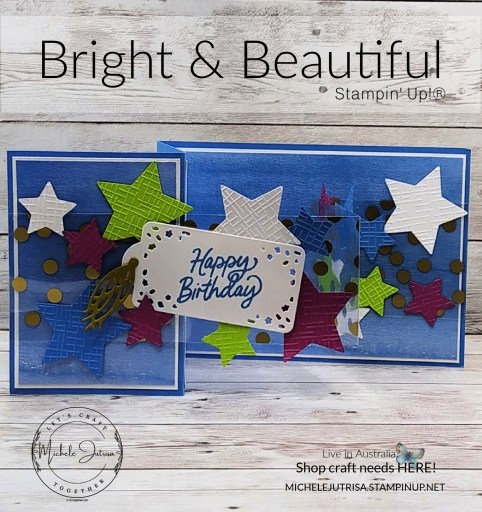
Bright & Beautiful – May Fun Fold Challenge

Welcome to Let’s Craft Together Blog Hop. We are a group of Australian Stampin’ Up!® Demonstrators that are coming together to share our creative ideas with you. We are happy that you can join us and hope that we can Inspire you to make creations of your own. Each month we will be showing different ideas based around products, themes and challenges.

Thank you Kylie for this fun challenge, Double Z-Fold cards are a easy & fun. There are so many great variations to the Z- Fold Card…check out this Pinterest page on Z-Fold Cards using Stampin’ Up! Products.

Bright & Beautiful Double Z- Fold Card

I created my card using the Bright & Beautiful Suite from the NEW Annual 2023-24 Stampin’ Up!® Catalogue. If you love Birthdays, Balloons and stars this is a fun suite. Great for birthday cards, general celebrations or any special moments. The dies cut balloons, stars, tags and work well for shaker cards. The Bright & Beautiful Designer Series Paper (DSP) is 6 x 6″, one side of the DSP has fun type images of stars, strips, waves, strips and confetti. The reverse side has ombre effects, variegate or shabby (as per my card), giving great texture effects for your cards.

The DSP coordinates with Berry Burst, Bubble Bath, Lemon Lime Twist, Pretty Peacock, Azure Afternoon and Blueberry Bushel. For my card I used the Azure Afternoon DSP and die cut stars in Berry Burst, Basic White, Azure Afternoon and Parakeet Party.

To add some extra texture to the stars I embossed them using one of the Basics 3D Embossing Folder found on the Online Exclusives in my Online Store.

The Bright & Beautiful Suite also includes Gold celebration Specialty Designer Series Paper – window sheets in 3 designs – spots, stars and confetti, streamer twirls. One side of the sheets are gold and the other side is in silver. I used the gold spots for the 2nd part of the Double Z-Fold, to create a see through element to my card. I was then able to attach the stars and tag to the window sheet so the stars and tag look like they are floating.

NB: make sure you use your bone folder to crease in the folds and to adhere to the card base I used lots of glue dots that hind nicely behind the dots.

On the back of the card I have added a panel to write your Birthday Greetings on.

Thank you for stopping by and reading my Blog. I hope you have enjoyed my projects & that you’re inspired to get crafty!  

You may be starting here or have come from someone else’s blog – either way there is a list at the end of this post to help you move around all the different blogs and get many amazing ideas. We all have our country listed – so if you are looking for a demonstrator in your country, these demonstrators would love to look after you with your Stampin’ Up! ® shopping or if you would like to join our Stampin’ Up!® teams.

Follow the Hop here..

Stampin’ Up! products used in today’s Project

Product List

Online Exclusives

To all the Online Exclusives click HERE or on the image below, this items will not be found in the catalogues so check back throughout the year to see what is new.

Join My Team

If you have been sitting on the fence not sure if you should JOIN the Stampin’ Up! Family or not….well now is the time to jump down and JOIN.

If you enjoyed this post, please be sure to . . . 

Hello, Irresistible & Butterfly Brilliance – Live with Michele

I had so much fun on my ‘Live’ this week. This card was created with Stampin’ Up! products coming and going, also die cuts left over from other projects – Vellum Leaves, Flowers and leaves cut from Designer Series Paper.

Shimmery White Cardstock and Butterfly Brilliance Bundle will soon be leaving us. I am going to miss them, but I am also looking forward to all the new products coming. I am really enjoying the Wild Wheat Cardstock and Ink from the New 2023-25 In-Colours, it has a lovely Green/gold tone which for me is a great substitute for Gold Foil.

I also used one of the Basic 3D Embossing Folders, this was the first I time I have used this folder and looks great with the other elements – floral dies and leaves.

Below is a video showing how the card was made.

Measurements Used…

Thank you for stopping by and reading my Blog. I hope you have enjoyed my projects & that you’re inspired to get crafty!  

Stampin’ Up! products used in today’s Project

All products used are listed below and are linked to my On-Line Store

Product List

Join My Team

If you have been sitting on the fence not sure if you should JOIN the Stampin’ Up! Family or not….well now is the time to jump down and JOIN.

View the Sale-A-Bration Catalogue Here

If you enjoyed this post, please be sure to . . . 

Regency Park – March Class

This month in my March In-home class we created cards using products from the Stampin’ Up!® Regency Park Suite Collection from the 2023 Mini Catalogue. There is so much in this suite….there is 2 bundles, Textured Shimmer paper, Cane Weave Embossing Folder, Night of Navy Bordered Ribbon, Adhesive Backed Milky Dots and 6 x 6″ Regency Park Designer Series Paper.

The good thing is some of these products will be staying in the new Stampin’ Up!® 2023-24 Catalogue but the sad thing is the bundles will be gone and the Regency Park Designer Series Paper will also be gone.

My advise….order them now if you want them or the 10% with the Bundles (at time of posting the availability of Suite or DSP unknown)

In my search for ideas I came across a YouTube Channel called Call Me (Crafty) Al. Both the card above and below came from her channel. She has a series called Sheet Load of Cards and these are where she shows and has a Printable PDF of card ideas where you want to make more than one of the same card…great for multiple cards and classes. You would just need to adjust some of the measurements for the Australian A4 Cardstock and our different card size.

Both of these cards really didn’t need much tweaking at all.

The other thing I would say is that if your looking for the link to her PDF’s, you do need to search the page. They were about half way down the Links or at the end.

Card Above Link – March 2023 SheetLoad of Cards | Debut & FREE Printable #SLCTMar2023

Card Below Link- January 2021 SheetLoad of Cards | Debut & FREE Printable

Now, I did change this one a bit to suite the stamps.

Al has lots of great ideas and when the crafting juices are not flowing, it’s good to see what others are creating. Just always give credit to those you have CASE’d and their ideas, and play with them to make them your own.

CASE stands for “Copy and Share Everything” OR “Copy and Selectively Edit” (meaning putting your own spin on another’s design or idea)

The card below is mine, I could CASE everything, could I!

With this card I also added the stitched circle from the Stylish Shapes and the Bough Punch. The sentiment came from the Go to Greetings Stamp set

Thank you for stopping by and reading my Blog. I hope you have enjoyed my projects & that you’re inspired to get crafty!  

Stampin’ Up! products used in today’s Project

Product List

View Mini Catalogue or Shop on Line Here


5 January – 1 May 2023
View Online | Shop Online

Join My Team

If you have been sitting on the fence not sure if you should JOIN the Stampin’ Up! Family or not….well now is the time to jump down and JOIN.

If you enjoyed this post, please be sure to . . . 

Abigail Rose Gift Tag – Live with Michele

This week I decided to use a suite I haven’t used much, Abigail Rose Suite Collection by Stampin’ Up!®. I have used the Cottage Rose Bundle but I hadn’t even opened the Abigail Rose Designer Series Paper until now…..and it is so pretty!

I have been wanting to create large gift tags for a while and as this suite we are now saying good buy to I thought I’d better use it. These tags are large enough to decorate a gift or gift bag. They have a little pocket where you can add ephemera or a little note.

I wanted to give the tags a bit of an aged or Shabby effect so I used my favorite Soft Suede Stampin’ Pad to do that. I am going to be so sad to say good bye to Soft Suede…I just might have to keep it just in case…LOL!

I also kept the colours subtle with Petal Pink and Soft Sea Foam cardstock for accents, such as the die cuts.

Thank you for stopping by and reading my Blog. I hope you have enjoyed my projects & that you’re inspired to get crafty!  

Stampin’ Up! products used in today’s Project

All products used are listed below and are linked to my On-Line Store

Product List

View Mini Catalogue or Shop on Line Here


5 January – 1 May 2023
View Online | Shop Online

Join My Team

If you have been sitting on the fence not sure if you should JOIN the Stampin’ Up! Family or not….well now is the time to jump down and JOIN.

View the Sale-A-Bration Catalogue Here

If you enjoyed this post, please be sure to . . . 

Elegant Boarder and Two-Tone Flora -Live with Michele

On this weeks ‘Live’ I created a card that steps a little out of my comfort zone. I wanted to try to push myself a little further but it just didn’t happen. My plain was to use a variety of stamps from different sets and I had a few lined up. But as I started working I ended up using just the one set – Two-Tone Flora along with one of the Elegant Boarder Dies cards I cut last week.

Even though I used the Flirty Flamingo Classic Stampin’ Pad, I ended up using the Calypso Coral Cardstock…it still works OK. These things happen when you do a Live and afterwards you think…Why did I do that?

The Elegant Boarder Dies in one of the Online Exclusives found on my Online Store. These items will not be found in any catalogue. Also while you are there make sure you have a look at the punches..Stampin’ Up! ® have added back 2 circle punches…always a good idea to always check the Online Store for Clearance Rack or any new products.

As you will see watching the video below it was still a lot of fun and sometimes doing something different can be good.

Measurements Used…

Thank you for stopping by and reading my Blog. I hope you have enjoyed my projects & that you’re inspired to get crafty!  

Stampin’ Up! products used in today’s Project

All products used are listed below and are linked to my On-Line Store

Product List

View Mini Catalogue or Shop on Line Here


5 January – 1 May 2023
View Online | Shop Online

Join My Team

If you have been sitting on the fence not sure if you should JOIN the Stampin’ Up! Family or not….well now is the time to jump down and JOIN.

If you enjoyed this post, please be sure to . . . 

Fancy Flora Creativity Abounds Blog Hop

Welcome to Creativity Abounds Blog Hop.   We are a group of very keen Stampin’ Up!® Demonstrators from all around the world that are coming together to share our creative ideas with you.  We are happy that you can join us and hope that we can Inspire you to make creations of your own.

Fancy Flora Suite Collection

I am really enjoying playing with this suite, I put of buying it for a little while, until I worked out what I was wanting……In the end I just had to get it, I love the flowers and the Designer Series Paper is stunning. There is so much in this suite it is totally worth the extra cost. There are 2 Bundles of Stamps and coordinating dies. But don’t feel you have to purchase the lot you can purchase just what you want.

** Remember you get a 10% off when you purchase the Bundles – Two-Tone Flora Bundle and Something Fancy Bundle

What is in the Collection..

My Card – Fancy Flora Fun Fold

This is a 3 Fold Card, where the left side folds in first and then the left over the top. This card has two card fronts and I needed to show off this DSP, i just love all these colours.

This is a two step stamp and I found it easier to stamp the detailed image first and then using the same colour and the second image, stamp off onto a scrap of paper before stamping the rest of the flower. I used the centers of the flowers (stamen) as my guide for lining yp the images.

You may be starting here or have come from someone else’s blog – either way there is a list at the end of this post to help you move around all the different blogs and get many amazing ideas. We all have our country listed – so if you are looking for a demonstrator in your country, these demonstrators would love to look after you with your Stampin’ Up! ® shopping or if you would like to join our Stampin’ Up!® teams.

Follow the Hop here..

For More Inspiration we have our new Tutorial Bundle

Meet the Design Team of Creativity Abounds..

Stampin’ Up! Product Used in today’s project

Product List

Mini Catalogue 5 Jan – 1 May 2023


5 January – 1 May 2023
View Online | Shop Online

Join My Team

If you have been sitting on the fence not sure if you should JOIN the Stampin’ Up! Family or not….well now is the time to jump down and JOIN.

If you enjoyed this post, please be sure to . . . 

Regency Park #003 Sketch Challenge – Let’s Craft Together Blog Hop

Welcome to Let’s Craft Together Blog Hop. We are a group of Australian Stampin’ Up!® Demonstrators that are coming together to share our creative ideas with you. We are happy that you can join us and hope that we can Inspire you to make creations of your own. Each month we will be showing different ideas based around products, themes and challenges.

Our challenge this month is a Sketch Challenge by Maheswari. I love the layers of two frames that are slightly twisted, with decorative elements on diagonal corners.

Regency Park

For my card I have used the Regency Park Suite by Stampin’ Up!® and to create my card I used manly the Petal Park Bundle. This is such a simple bundle to use, you can colour the flowers by hand with any medium you wish or use the stamps to colour the flowers. The suite includes a simple simple punch to make cut out the flowers and one leaf quick and easy.

The suite consists of two Bundles

  • Petal Park Bundle 160577 Flowers & leaf stamps plus the Punch
  • Sentimental Park Bundle 160567 – Sentiments, more flowers & leaves and Dies

It then has other items in the suite including

  • Textured 12 x12 Shimmer Paper
  • Can Weave 3D Embossing Folder
  • Night of Navy Boardered Ribbon
  • Adhesive Backed Milky Dots
  • Regency Park 6 x 6 DSP

I created the two rectangle frames cut from the Rectangle Stitched Frames and Basic White Cardstock.

The Flowers are coloured with Watercolour Pencils onto Basic White Cardstock. Instead of Blending the pencils water or Blender Pens I have used Memento Ink and Blends Colour Lifter. Patty Bennett did a very good video on this technique – Blending Watercolor Pencils with Color Lifter

How to make this card…

  • Card Front – Embossed, I used for this one of the Basic 3D Folders 161598 from the Online Exclusive, you could of course use the 3D embossing folder that comes with the suite, but I wanted something a little more subtle.
  • Frames – Placing one die side of the other, die cut 2 frames.
  • Flowers Stamping – Stamp 3 sets of flowers and 8 leaves using Memento Tuxedo.
  • Flowers, coloured with pencils and blended with Blends Colour Lifter
    • Large flowers – Balmy Blue and Night of Navy
    • Medium Flowers – Flirty Flamingo, Mellon Mambo & Daffodil Delight
    • Small Flower – Gorgeous Grape & Mellon Mambo
    • Leaves – Old Olive & Granny Apple Green
  • Bakers twine split and added under flowers
  • Sentiment – Embossed in White Embossing Powder
  • Card Insert – Insert strip embossed with the 3D Embossing Folder

Cutting Measurements

PaperColourImperial/LetterMetric/A4
Card Base Basic White Thick Cardstock4 ¼ x 11”, score @ 5 ½”10.5 x 29.9cm, score @ 14.9cm
Card Front Basic White Card stock4 x 5 ¼”10 x 14.4cm
Frames Basic White Card stock3½ x 4½” x 29 x 12cm x 2
FlowersBasic White Card stock4 ¼ x 5½”10.5 x 14.9cm
SentimentBasic Black1½ x 3″3 x 8cm
Card InsertBasic White Card stock  4 x 5 ¼” 10 x 14.4cm
Card Insert Strip Basic White Card stock 1 x 4″ 2.5 x 10cm

Thank you for stopping by and reading my Blog. I hope you have enjoyed my projects & that you’re inspired to get crafty!  

You may be starting here or have come from someone else’s blog – either way there is a list at the end of this post to help you move around all the different blogs and get many amazing ideas. We all have our country listed – so if you are looking for a demonstrator in your country, these demonstrators would love to look after you with your Stampin’ Up! ® shopping or if you would like to join our Stampin’ Up!® teams.

Follow the Hop here..

Stampin’ Up! products used in today’s Project

Product List

View Mini Catalogue or Shop on Line Here


5 January – 1 May 2023
View Online | Shop Online

Join My Team

If you have been sitting on the fence not sure if you should JOIN the Stampin’ Up! Family or not….well now is the time to jump down and JOIN.

If you enjoyed this post, please be sure to . . . 

Fancy Flora -Live with Michele

The card I made last week is made using the Fancy Flora Suite Collection, which I made on my ‘Live with Michele’. every Friday at 1pm (AEDT). This week I was running a bit late having too much fun playing with this suite. Have added the link to the video below.

There is a lot is this suite –

Measurements Used…

Thank you for stopping by and reading my Blog. I hope you have enjoyed my projects & that you’re inspired to get crafty!  

Stampin’ Up! products used in today’s Project

All products used are listed below and are linked to my On-Line Store

Product List

View Mini Catalogue or Shop on Line Here


5 January – 1 May 2023
View Online | Shop Online

View Sale-A-Bration Catalogue or Shop on Line Here

Stampin' Up! Sale-a-Bration Catalogue
5 January – 28 February 2023
View Online | Shop Online

Join My Team

If you have been sitting on the fence not sure if you should JOIN the Stampin’ Up! Family or not….well now is the time to jump down and JOIN.

View the Sale-A-Bration Catalogue Here

If you enjoyed this post, please be sure to . . . 

Two-Toned Flora

This was a fun card to make using the Two-Tone Dies and Something Fancy Bundle found in the Stampin’ Up! 2023 Mini Catalogue.

Last weekend the Creativity Abounds Team ran a By the Bay Stamp Camp, it was so much fun. Kylie Swain gave us a Colour Challenge and this card I made using her challenge.

How to make this card…

Cutting Measurements

PaperColourImperialMetric
Card Base Basic White4 ¼ x 11”, score @ 5 ½”10.5 x 29.9cm, score @ 14.9cm
Card Front Basic White4 x 5 ¼”10 x 14.4cm
Strip Basic White1 x 4″2.5 x 10cm
Sentiment Basic White 1 x 3″2.5 x 7cm 
  • Cut all cardstock
  • Card Front
    • Using large Die Cut, die cut in Basic White cardstock. You may need to run through twice.
    • Trim Die cut piece to 10cm (4″) wide, trim length down to 13.7cm (5 ⅜”)
    • With Blending brush, brush on the ink onto the flowers and leaves. Colours used- Polished Pink, Granny Apple Green, Bermuda Bay and Crushed Curry
    • Metric Card – Card Front I normally use is 14.4cm, to make up the difference cut card into 2 pieces about where the strip will cover. Spread the two pieces and adhere one piece from the top down and the other from the bottom up. Leaving a gap as per photo below.
    • Dot multi purpose glue onto the back of die cut and attach to the card.
  • Strip – With Granny Apple Green ink and blending brush, brush ink around all four sides.
  • Add diamenionals to the back of the strip and adhere to the card.
  • Stamp ‘Happy Birthday’ sentiment in Memento Tuxedo Black onto basic White Cardstock. Die cut with die from the Something Fancy Bundle. Attach with dimensionals.

Colour Challenge

Thank you for stopping by and reading my Blog. I hope you have enjoyed my projects & that you’re inspired to get crafty!  

Stampin’ Up! products used in today’s Project

Product List
——>

View Mini Catalogue or Shop on Line Here


5 January – 1 May 2023
View Online | Shop Online

View Sale-A-Bration Catalogue or Shop on Line Here

Stampin' Up! Sale-a-Bration Catalogue
5 January – 28 February 2023
View Online | Shop Online

Join My Team

If you have been sitting on the fence not sure if you should JOIN the Stampin’ Up! Family or not….well now is the time to jump down and JOIN.

If you enjoyed this post, please be sure to . . .