Colour & Contour

Hi and welcome today to my Blog.

Here is another ‘Sneak Peek’ to another product coming in the NEW Stampin’ Up! Annual Catalogue. Colour & Contour Bundle is made up of 5 frames, 1 scallop edge die and 2 dies to cut the floral images from the stamp set.

Here I have also used the Pattern Party Designer Series Paper(DSP), this DSP is found at the back of the Catalogue in the ‘Host & Earn’ section. You can earn this DSP when you have Party Sales over $310….and it will be FREE.

Above image is taken from the current 2020-21 Annual Catalogue showing what Rewards you can earn from Hosting a Party or by placing an order over $250 (minim)

The Pattern Party Designer Series Paper has 48 sheets- 4 each of 12 double-sided designs. One side of the Paper has coloured images and on the other Black and White images, which can be coloured to coordinate with what ever colours you are using with most of our colouring tools.

For my card I have coloured the back & white DSP with a sponge dauber and Highland Heather Ink Pads.

Facebook Live Video

2021-22 Annual Catalogue Click HERE to request a copy*

*Australia ONLY

Thank you for stopping by and reading my Blog. I hope you have enjoyed my projects & that you’re inspired to get crafty!  

If you enjoyed this post, please be sure to . . . 

Creativity Abounds Masculine Tutorial Bundle

Here is another Bundle by the Creativity Abounds Design Team. Do you find it hard to create for those men in your life I do, there is not much available. So us girls of the Creativity Abound have come up with some fantastic Masculine card ideas.

Here are 13 Exclusive Tutorials using different products from both the Annual Catalogue , as well as carry over products to the NEW Annual Catalogue to be released in May and the 2021 Jan- Jun Mini Catalogue.

Measurements are in both Imperial/ US Letter size and Metric/ A4.

There are a couple of different ways to get this tutorial…

  1. Purchase the tutorial by Clicking HERE or above
  2. Place a $50 order with me receive for FREE
  3. Join my team & receive for FREE

Thank you for stopping by and reading my Blog. I hope you have enjoyed my projects & that you’re inspired to get crafty!  

If you enjoyed this post, please be sure to . . . 

Sailing Home – April Creativity Abounds Blog Hop

Welcome to Creativity Abounds Blog Hop.   We are a group of very keen Stampin’ Up!® Demonstrators from all around the world that are coming together to share our creative ideas with you.  We are happy that you can join us and hope that we can Inspire you to make creations of your own.

Our them this month is MASCULINE…I am a mother of 4 boys and I always have trouble making cards for them. So this has been a good challenge to come up with a masculine card.

Sailing Home by Stampin' Up! Coloured using Blending Brushes and masking

For this card I used the Sailing Home Stamp set and coordinating dies Smooth Sailing. The ocean was created by masking with a torn piece of paper and using the Blending Brushes to create waves. To create the sun I made a mask by cutting a circle using the Layering Circle Dies and brushing the colour on.

After creating the background I stamped on the sailing boat image using Memento Black Ink and coloured it in with Blends- Soft Suede and Poppy Parade

Sailing Home by Stampin' Up! Coloured using Blending Brushes and masking

You may be starting here or have come from someone else’s blog – either way there is a list at the end of this post to help you move around all the different blogs and get many amazing ideas. We all have our country listed – so if you are looking for a demonstrator in your country, these demonstrators would love to look after you with your Stampin’ Up! ® shopping or if you would like to join our Stampin’ Up!® teams.

Follow the Hop here..

For More Inspiration we have our new Tutorial Bundle

he projects featured in this bundle are totally EXCLUSIVE, which means they can not be found anywhere else online.

Measurements are in both Imperial/ US Letter size and Metric/ A4.

There are a couple of different ways to get this tutorial…

  1. Purchase the tutorial by Clicking HERE
  2. Place a $50 order with me receive for FREE
  3. Join my team & receive for FREE

Here is the sneak peek images for this months Tutorial Bundle –

Meet the Design Team of Creativity Abounds..

Stampin’ Up! Product Used in today’s project

Product List

If you enjoyed this post, please be sure to . . . 

Butterfly Brilliance – Watercolour

Hi and welcome today to my Blog.

My card today I have used the Butterfly Brilliance Bundle by Stampin’ Up! ® to create my card. Each of the butterflies carefully coloured using Stampin’ Up! Classic Stampin’ ink Refill with Gold splater highlighting the central butterfly.

Butterfly Brilliance Bundle by Stampin' Up!. Watercoloured on Fluid 100 Watercolour Paper

How to make this card…

Products Used (products link to On-Line store at the end of blog post)-

  • Butterfly Brilliance Bundle
  • Fluid 100 Watercolour Paper
  • Basic White Cardstock
  • Basic Black Cardstock
  • Painted Texture 3D Embossing Folder
  • Gilded Leafing
  • Reinkers – Pacific Point, Night of Navy, Flirty Flamingo, So Saffron, Daffodil Delight, Early Espresso.
  • WaterPainters
  • Stamparatus
  • Stampin’ Cut & Emboss Machine
  • Multi-pupose Glue
  • Dimensionals

Card Measurements

  • Card Base Basic White – 10.5 x 29.9cm, score at 14.9cm
  • Card Mat Basic Black – 10 x 14.4cm
  • Card Front Basic White – 9.7 x 14.1cm
  • Card Insert Basic White – 10 x 14.4cm

Instructions –

  • Cut all required cardstock, score and fold card base
  • Run Basic White card front through Stampin’ Cut & Emboss machine using the Painted Texture 3D Embossing Folder.
  • Adhere the Basic White card front to the Basic Black card mat using Multi-purpose Glue or Stampin’ Seal.
  • Adhere matted card front to the Basic White card base using Multi-purpose Glue or Stampin’ Seal.
  • Stamp the Butterfly images onto Fluid 100 Watercolour Paper using Stazon Black ink Pad. Stazon is a Acid Free, permanent ink for stamping images to watercolour. Stazon can also be used for non-porus surfaces like Window sheets. To make the stamping of the butterflies easy and to make sure to get a clear image I used the Stamparatus, reinking and stamping a couple of times. I added the silicon sheet under the watercolour paper to get a little extra height and help get a good ink coverage.
  • Once the Stazon ink has dried you can start water colouring using the Water Painter and reinkers.
  • Water colour the butterflies
    • Work on one butterfly at a time
    • give the butterfly a light wash of water over the top before adding colour.
    • Add light layers of colour building up to the colour you want.
    • Start with the lightest colour and add darker colour as highlights.
    • Let each colour dry slightly before adding more or another colour
    • Let butterflies dry completely.
  • On a plate mix a small amount of multi-purpose glue and water to get a slightly runny consistency. Using a old paint brush lightly splatter the watered down glue onto the large butterfly. Let the glue dry until tacky. Add Gilded Leaf to the tacky glue and rub away the excess with a soft brush.
  • Die cut the butterflies using the coordinating die from the bundle.
  • Add dimensionals to the back of the butterflies down the length of body and attach to the card front
  • Add insert to the inside of the card.
Butterfly Brilliance Bundle by Stampin' Up!. Watercoloured on Fluid 100 Watercolour Paper

Thank you for stopping by and reading my Blog. I hope you have enjoyed my projects & that you’re inspired to get crafty!  

Stampin’ Up! products used in today’s Project

Product List

If you enjoyed this post, please be sure to . . . 

Hand-Penned Suite

Hi and welcome today to my Blog.

On Friday on my Facebook Live I focused on the Hand-Penned Petals Suite by Stampin’ Up! which will be released when the NEW Annual Catalogue is launched in May.

The products in the Hand-Penned Suite 155503 are-

  • Hand-Petal Petals Bundle 155492, Hand-Penned Petals Photopolymer Stamp Set and Penned Flower Dies
  • Hand-Penned Designer Series Paper 155499
  • Genial Gems 155500
Haned-Penned by Stampin' Up! Products from Pre-order 2021-22 Catalogue

The Hand-Penned Petals Stamps are a Photopolymer Stamp, it is made up of a outline stamp and a filler stamp. The filler stamp is a Distinktive Stamp which creates different opacities in a single stamped image. Below is a great tip on using this type of stamp.

Taken from a previous Catalogue.

When stamping the filler stamp you will notice the stamp is not exact in size to the outline…that’s OK, it’s the way it is supposed to be.

Haned-Penned by Stampin' Up! Products from Pre-order 2021-22 Catalogue

If you missed my FB Live I have linked it below. All the measurements used are mentioned on the Video.

Other products used on my card are (* NEW products, will be released in May)-

  • *2021-22 In-Colours Cardstock Soft Succulent 155777 , Fresh Freesia 155614
  • * 2021-22 In-Colour Stampin’ Pads – Fresh Freesia 155611, Soft Succulent 155778, Pale Papaya 155670
  • *Genial Gems 155500
  • *Baker’s Twine Basic Essentials pack 155475
  • *Tailor Made Tags 155563
  • Basic White Cardstock 159228
  • Tasteful texture 3D Embossing Folder 152718
  • Wink of Stella 141897
  • White Crinkle Seam Binding 151326
  • Memento Tuxedo Black 132708

2021-22 Annual Catalogue Click HERE to request a copy*

*Australia ONLY

Thank you for stopping by and reading my Blog. I hope you have enjoyed my projects & that you’re inspired to get crafty!  

Stampin’ Up! products used in today’s Project

Only products available as of 18.4.21…other products used will be available in May 2021

Product List

If you enjoyed this post, please be sure to . . . 

Hand- Penned – Pre-order Reveal

Hi and welcome today to my Blog.

Today’s cards I made using the Hand-penned Memories & More Card Pack from the New Stampin’ Up! ® Annual Catalogue.

These cards have been designed to be used as card fronts along with the Hand-Penned Memories & More Cards & Envelopes or with the 6 8″ Album and Variety Pack Photo pocket Pages

Hand-Penned Memories and More Cards, Cards and Envelopes by Stampin' Up!

Card 1

  • Using a 10.2 x 15.2cm (6 x 4″) Hand-penned Memories & More Card, cut down to 5cm (2″) x 15.2cm,
  • Stamp the ‘Thanks’ sentiment onto the Memories & More Card using Memento Tuxedo Black ink.
  • Mat the Memories & More Card with a piece of Fresh Freesia Cardstock from the 2021-22 In-Colours.The scalloped edge was cut with die from the Hand-Penned Petals Bundle.
  • Crumb Cake Bakers Twine from the Baker’s Twine Essentials Packed wrapped around twice and tied off with a bow.
  • Adhere the matted card front to the Hand-penned Memories & More Card using dimensionals.
  • Three Fresh Freesia In-Colour Jewels placed around the sentiment.
Hand-Penned Memories and More Cards, Cards and Envelopes by Stampin' Up!

Card 2

  • Hand-penned Memories& More Card is matted with a piece of Fresh Freesia cardstock.
  • The matted card front is then attached to the card base using Seal.
  • Stamp the sentiment onto one of the stickers from the Memories & more pack. Using an Embossing Buddy dust the back of the sticker to remove the adhesive. Attach dimensionals to the back of the sticker and attach to the card front.
  • Tie a double bow using the Basic White Bakers Twine, add a glue dot to bow and tuck under the sentiment
  • Add 3 Mint Macaron gems from the Genial Gems
Hand-Penned Memories and More Cards, Cards and Envelopes by Stampin' Up!

Card 3

  • Hand-penned Memories& More Card is matted with a piece of Evening Evergreen cardstock.
  • Adhere to card base using Seal.
  • Using a sentiment from the Many Messages Bundle found in the current Mini Catalogue attach to card from with Mini Dimensionals.
  • Add 3 Evening Evergreen Jewels to the card front
Hand-Penned Memories and More Cards, Cards and Envelopes by Stampin' Up!

Scrapbooking with Memories & More

Displaying your treasured photo’s and memories is very simple with the Memories & More Cards and a pack of the Variety Pack 6 x8″ Photo pockets Pages. Your photo’s will be protected in these pages along with your family stories. These pages fit into our Basic Black 6 x 8″ Albums

Thank you for stopping by and reading my Blog. I hope you have enjoyed my projects & that you’re inspired to get crafty!  

If you would like a copy of the NEW Annual Catalogue and you Live in Australia then Click HERE

If you enjoyed this post, please be sure to . . . 

Hydrangea Hill

Hi and welcome today to my Blog.

My card today is a very simple card using products from the Stampin’ Up! Hydrangea Hill Suite Collection, 2021 Jan-Jun Mini Catalogue.

This card is a very simple card because I wanted the Hydrangea Hill Mercury Glass Designer Acetate to be a feature of the card.

Hydrangea Hill by Stampin' Up!

Hydrangea Hill Tutorial

Click on the Link below for a step by step instructions for making this card. Including all measurements for both A4 – Metric and Letter Size – Imperial

This tutorial was given to those that follow me through my Newsletter. If you would like to receive my Newsletter plus the monthly Free Tutorial Click on the link below.

Hydrangea Hill bt Stampin' Up!

Thank you for stopping by and reading my Blog. I hope you have enjoyed my projects & that you’re inspired to get crafty!  

Product List

If you enjoyed this post, please be sure to . . . 

Shark Frenzy Tunnel Card

Hi and welcome today to my Blog.

The card I made for this weeks Facebook live is a Tunnel card and I used the Shark Frenzy Bundle to create a underwater scene. his is a fun Bundle to use with the play on the fun kids song – Baby Shark. In the stamp set and dies you have all the fun bits to dress these sharks up as Mumma Shark, Daddy Shark, Grand parents or Baby Shark. I am sure you will have a lot of fun with this one.

In the New Stampin’ Up! ® there will be some great dies that can be used for these tunnel cards…and I’m looking forward to using them when available. Sorry I can’t show you yet but they look like fun to use and i have lots of ideas.

Shark Frenzy by Stampin' Up!, this is a tunnel card using the Layering Ovals to make the tunnel.

How to make this card…

To see how I made this card watch the YouTube video and please Subscribe to my Channel and help me get to my goal of 1000 subscribers…that way i can do Live videos on YouTube for you to watch.

Measurements Used –

  • Card Base Pool Party – 14.9 x21cm, score at 10.5cm
  • Layer 1 (Middle Layer) Coastal cabana – 10 x 14.4cm
  • Layer 2 (Front Layer) Bermuda Bay – 10 x 14.4cm
  • Vellum Waves – 2 x 5 x 10cm
  • Card Insert Basic White – 10 x 14.4cm
  • Scrapes of Bumble Bee , Magenta Madness, Pool Party, Bermuda Bay, Pretty Peacock
  • ¼ sheet Basic White for stamping of sharks & sentiment
  • Another small piece of Basic White with Adhesive Sheet adhered to the back for die cutting the fine Bubbles.
Shark Frenzy by Stampin' Up!, this is a tunnel card using the Layering Ovals to make the tunnel.

Thank you for stopping by and reading my Blog. I hope you have enjoyed my projects & that you’re inspired to get crafty!  

Stampin’ Up! products used in today’s Project

Product List

The Last- Chance products are now listed on the On-Line Store…and they are going really fast. There are some really great reductions so don’t miss out and check them out now! Click on the image below to see all the Last-Chance products.

If you enjoyed this post, please be sure to . . . 

Butterfly Brilliance – Stamp Resist

Hi and welcome today to my Blog.

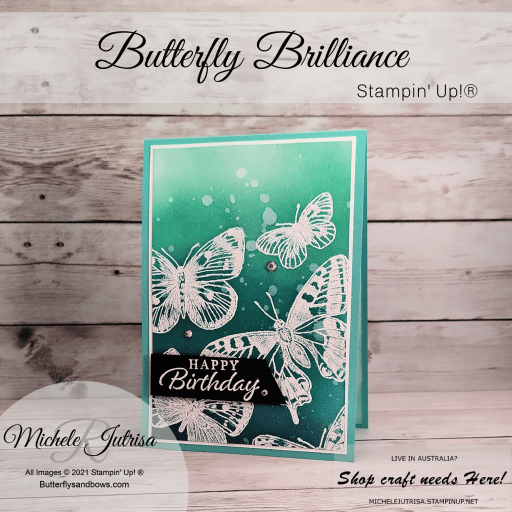
My card today is from last Friday’s Facebook Live. Using the Emboss Resist Technique I have created this simple Birthday Card.

Butterfly Brilliance by Stampin' Up! Stamp Resist Technique

Measurements Used

  • Card Base Coastal Cabana – 10.5 x 29.9, score at 14.9
  • Mat Basic White – 9.8 x 14.2cm
  • Card Front Basic White – 9.5 x 13.9cm
  • Sentiment Banner Basic Black – 2 x 9.5cm
  • Card Insert Basic White – 10 x 14.4cm
Butterfly Brilliance by Stampin' Up! Stamp Resist Technique

Thank you for stopping by and reading my Blog. I hope you have enjoyed my projects & that you’re inspired to get crafty!  

Stampin’ Up! products used in today’s Project

Product List

If you enjoyed this post, please be sure to . . . 

Steampunk – Just Add Ink

Hi and welcome today to my Blog.

Today I thought I would try a challenge…..and why not something different, very different.

What is Steampunk

Here’s a little Google/wikipedia blurb to explain the fundamentals of steampunk…..(copied from Just Add Ink)

Steampunk is a retro-futuristic subgenre of science fiction that incorporates technology and aesthetic designs inspired by 19th-century industrial steam-powered machinery. … Such technologies may include fictional machines like those found in the works of H. G. Wells and Jules Verne.

The Just Add Ink Design Team have created some wonderful examples of Steampunk, check them out HERE . Why not give this challenge a go, it was so much fun…

Here’s my take on Steampunk..

Stampin' Up! Products including Brilliant Wings Dies, Garage Gears Dies, Geared Up Garage Stamps, Swirly Frames stamps, Fancy Phrases stamps.

I have used 3 different stamp sets and 2 sets of dies to create this card. It was so much fun thinking out side of the box of my usual style of work. Setting yourself a challenge to try something different can be a real release and give you a wonderful sense of achievement.

I usually try not to use product that has been deleted…but with this card I wanted to add some foil/ metal looking cardstock and did so with the Brushed Metallic Cardstock from the 2020Holiday Catalogue.

Stampin' Up! Products including Brilliant Wings Dies, Garage Gears Dies, Geared Up Garage Stamps, Swirly Frames stamps, Fancy Phrases stamps.

Thank you for stopping by and reading my Blog. I hope you have enjoyed my projects & that you’re inspired to get crafty!  

Stampin’ Up! products used in today’s Project

Product List

If you enjoyed this post, please be sure to . . .